Have fresh herbs all year round with this simple Preserving Herbs with Olive Oil hack.
Summer is coming to an end and it’s time to start harvesting my garden so I can take advantage of all of its beauty and flavors. I love growing herbs in my garden because I can just walk to my backyard and pick fresh herbs for my meals all summer long. Nothing beats the flavor of fresh Basil and Rosemary, and I want those flavors to last all winter long. Thankfully, they can! There are two different ways I like to preserve my herbs at the end of summer; drying or freezing. Today, I will be focusing on how to freeze your leftover herbs so you can enjoy them for months to come. They are even frozen in olive oil so that you can just pop them into your pans for instant flavor. This is such a helpful tip you can use all year round when you have leftover herbs. When stored in the freezer in an airtight bag or ice-cube tray, they can last for months.
1. Wash and dry your herbs so they are nice and clean.
2. Chop up your herbs so they can fit nicely into each ice-cube tray.
3. Fill up each ice cube tray with herbs and top with olive oil or melted butter.
4. Place in freezer and you’re done!
5. To use, any time you want to add some fresh herbs to your meal, simply pop an “herb ice cube” out of the tray and place it into a hot pan. The heat will instantly start to melt the oil and release the wonderful flavors and textures of the herbs.
Help your fruit stay fresh longer with this amazing DIY Fruit Wash.
Did you know that pesticides are a common part of produce production in our country? I was a little shocked to find out that after the harvest, the pesticides aren’t washed off the fruit. Instead the fruit gets dipped (apples in particular) in a big vat of colored wax. We are told that this is to help the fruit stay fresh for longer…Well, I ain’t buyin’ it.
Okay, okay…I don’t buy that hype, but of course I still by produce. Especially apples. They are so crunchy and sweet! How can anyone resist a scrumptious apple? For a while I was putting my apples into a sink filled with equal parts apple cider vinegar and water. While this does seem to remove bugs, worms, and a good amount of dirt and grime, that waxy coating is still on the apple, and I just have this sneaking suspicion that all the pesticides are hiding in that wax. So, you know I had to find an inexpensive, all-natural solution to this dilemma.
This DIY Fruit Wash is perfect for stripping away all of your worries and suspicions about pesticides and what ever other cooties they put on our fruit during production and harvest. The lemon oil is amazing at cleaning produce when it is combined with just a couple other ingredients. For good measure, I created a fruit soak that also works way better than your standard apple cider vinegar soak.
Finally, we can throw caution to the wind and take a confident bite out of our fruit, and heck…why not take a confident bite out of life too?
For spray: Combine all ingredients in a spray bottle and shake well.
*To ensure your brand of essential oil (if you choose this option) mixes into the mixture and doesn’t sit on top, mix the baking soda and oil together in a dish first and then add it to the water.
Fill bottle and spray on fruit and let sit a couple of minutes before rinsing under cool water.
For soak: Fill your sink with warm water or fill a large bowl with water.
Place your fruit in the bowl (be sure that you do not add too much fruit at a time and do not make the water too hot) and add either your juice and vinegar mixture or the oil and vinegar mixture.
Let the fruit soak for about 25-30 minutes then rinse thoroughly.
DIY Fruit Wash
This fruit wash is all natural and so easy to make at home!
Spray on fruit and let sit for 2 minutes before rinsing with cool water
For fruit soak:
Substitute water with 1/2 cup white vinegar
Fill your sink with warm water or fill a large bowl with water.
Place your fruit in the bowl (be sure that you do not add too much fruit at a time and do not make the water too hot) and add either your juice and vinegar mixture or the oil and vinegar mixture.
Let the fruit soak for about 25-30 minutes then rinse thoroughly.
This post is sponsored by Maytag® with my own personal testimony regarding my recent upgrade to a washer and dryer from the brand.
I’ve gotta come clean.
I’ve developed a new relationship over these past six months.
Like all new relationships, we had to learn to trust each other.
I had to make sure not to overload the relationship or leave it sitting idle. On the other side, trust had to be earned and we had to get comfortable with each other.
After six months all I can say is that Maytag has become my new bestie.
I’ve totally been guilty of dumping so much stuff into my Maytag laundry set and each time it’s come out better than ever. What’s even better is that I’ve sometimes neglected and forgotten things in them and it still has worked out well. What I’m trying to say is that my time with has been totally one sided, with me getting all the benefits.
I’ve been putting these appliances to the test these last six months and the results have been better than I expected.
Here are some of the ways I’ve fallen head over heels for my washer and dryer.
THE FRESH HOLD OPTION. It’s the magic button on my washing machine which intermittently tumbles the loads and circulates air with a built-in fan up to 12 hours to keep clean clothes smelling fresh after the wash cycle ends.
Seriously, the Fresh Hold option on this baby has saved me! I can’t count the many times that I’ve forgotten about a load I put into my washer. With my old washer, I would come back to that old wash smell and have to rewash everything again. Well, those day are gone, my friends. Gone forever.
EASY TO USE. My washer and dryer are so very easy to use… even my lazy teenagers can figure them out. I love it so much when they do their own laundry, without needing me at all. No “moommmm.. how do I use this?” anymore. It’s so simple to use they just toss their clothes in and hit the power button to start. I do however wish there was a button on the machine that would remind them to actually pick up their clothes up off the floor of their rooms every day! Wouldn’t that be nice? A mom can dream!
I’ve also found THIS guide that has helped me decode laundry symbols – such a time saver!
THE LARGE CAPACITY. I have noticed a huge difference in the amount of laundry piles from before to having this set just six months down the road. The bigger capacity makes it so I’m able to get more done in less time – 4.5 Cu. Ft. for the washer and 7.4 Cu. Ft. for the dryer! And even if I’m not perfect about doing a load a day, it’s never seems to get completely out of control like before.
And I’m even willing to share Maytag with YOU! So, if you want to start your own relationship with Maytag, now is actually one of the best times.
You can visit www.Maytag.com/November to get deals before they’re gone through November 28! If you’re looking for a new laundry set, you should check out their washers and dryers. Since its Maytag, you know it’s a brand you can trust, and that your clothes will come out clean.
And who knows…you may just fall in love like I did.
This is a sponsored conversation written by me on behalf of Maytag. The opinions and text are all mine.
This is the second post in my Build a Home on a Budget Series. We’re talking all about which house plan or layout to choose from that will be the most cost effective. Every step of my house building process sent me into a crazy must-research, price comparison mode. I searched on Pinterest, Googled, and read articles after articles. I wanted to get the best quality home with lots of upgrades and still keep my budget. I really really HATE wasting money and wanted to do the whole process right. I spent way too much time trying to get everything perfect (I can admit it!) and even though I went through countless days of feeding my kids cereal for dinner and building mounds of laundry up by neglecting my daily routines for research purposes, I feel like it was worth it. I adore my new home. It’s even better than I dreamed it would be and I was able to stay within my budget.
WHO WILL BUILD YOUR HOME?
If you have the ability, know-how or connections to be your own builder/contractor you will save the most money doing it that way. However, as a newbie building my first house there was no way I was going to be able to do that. Looking back now though, it seems I could have easily done it as all it takes is someone who’s really great at scheduling and (ahem) nagging. As I mentioned in my dream house post here I looked into all the local home builders in my area to find the one with the best prices per sq. ft. and one that had great prices for upgrades as well.
There are all kinds of builders and building companies out there.
Spec Home Builders: these builders usually purchase a large lot of land, subdivide it and build many houses on the lot with their floor plans. Often times the builder saves money doing this and so they seem to have the best prices from what I’ve found. Some of them will do a custom house plan and some won’t. Some will build on your lot and some will not. Make sure and research all the different companies, visiting them, picking up their price sheets for home base prices as well as upgrades, viewing their homes and asking them if they will do a custom layout and what the price starts at. You must do your research. Even when you find a house plan you LOVE check into all the builders in your area. Because you never know if you can find a builder that can make nearly the same plan you just fell in love with for a lot less.
All other builders: the other builders out there will usually have great reputations as making quality homes and maybe that is important to you. But honestly whether you build with a spec home builder or a “more quality” builder you can oversee every step in the building process to make sure everything is done right if you want to. You can usually upgrade your windows or doors to get the best quality you desire. Plus the quality builders seemed in my area to charge 50% higher prices per sq. ft. than the spec home builders – Yikes! I found that building my house with a spec builder saved me money, and I still have a wonderful quality house.
So, my advice is to research, research, research. Find a builder that will give you the most for your money and one you can trust.
PICKING YOUR HOME LAYOUT PLAN
A lot of the time when you go to spec home builders they have a whole bunch of house plans for you to choose from. Sometimes they allow you to tweak their plans a little bit by adding a closet, changing a door location, expanding a bedroom etc, so keep that in mind. If the plan is almost what you want you may be able to tweak the plan and make your dream house. But those changes can cost money so make sure and check on those prices.
If you don’t find any layouts that you like in your price range, you are most likely a custom home plan person like me!
I kind of liked one spec house plan, but it wasn’t exactly what I wanted. So I went online and searched house layouts. There are tons of different sites out there that let you search by house type, bedrooms, sq. feet and more. Yep, you got it…more research.
Seriously, the research never ends! 🙂
Tip #1: to save money on a house layout look for house plans without too many edges. The more exterior corners, the more expensive it can be to build.
I searched until I found a layout that was almost exactly what I wanted. My dream house was a combination between the spec house and the online house layout. I went and used a free online program called floorplanner.com and started making my own layout. Here is my house layout – as you can see there is not too many edges or pop out exterior rooms. This saves money as many times builders have to pay more for framing houses with many edges.
Tip #2: Try to find a spec home builder that will do a custom built home for a great price.
I feel so fortunate to have found my builder (Olin Homes). My house plan was around 2700-2800 sq. feet and they gave me the same starting base price of one of their homes with the same sq. footage. I would have to pay a little more for my layout having additional windows or doors, but this was the best price around by far. So I got a custom house design for the spec house builder price. Basically the best of both worlds. The best part was that the builder took my online designed layout and for a fee re-created an actual blueprint design for building with. Bada – bing- bada- boom.
Tip #3 The more square footage of the house, the more expensive it can be. Make a few rooms smaller & save big.
When making my custom house plan with the free online program as mentioned above I reduced room sizes whenever I could to save money. Even reducing a foot off of a room can save thousands of dollars. So I made my master bedroom smaller, and had a two story opening in the family room. I could have used that space above the family room for a bonus room, but by opening it up I saved money and made my home feel much more open and spacious. I kept my master bathroom and kitchen area big however because those are usually rooms that add value to a home. So figure out what rooms you can shrink and save yo’ self some money.
Well, that’s about all I can think of right now. Do any of you out there have any other awesome tips for saving money on your house plan design? If so please leave a comment below.
I don’t know about you, but to me it sounds like an oxymoron to clean your dishwasher. Isn’t it cleaned every time you use the dishwasher? I mean it is what the dishwasher does—wash dishes. But just like with your washer machine, soap scum can build up along with food particles and other yuck.
So what should you do to clean your dishwasher? Just follow these steps …
How to Clean your Dishwasher
1. Take Out and Clean Dishwasher Parts
Take out all parts of the dishwasher that can be removed by hand. Typically dishwashers have a filter in them to remove and clean. In my Frigidaire Gallery® Dishwasher I have a fine grade and coarse grade filter, and so I only need to check and clean it when necessary if large food particles become trapped or when I notice a drop in cleaning performance. The filters on my dishwasher are self-cleaning, but when I want to do a deep clean or get out tough gunk I do clean those filters out. Here is the gunk I found when I cleaned my filter out….I know…ewwwww!
Take them out, and clean them with warm, soapy water. You may need a sponge to get all the gunk out of your filter.
2. Wipe out the inside of the Dishwasher with Soap & Water
Gunk—everything from food particles to bits of plastic—can get stuck in on the edges of the dishwasher door, or on the walls of the dishwasher. Take a dishcloth with warm soapy water and wipe it all down well.
3. Clean and Sanitize Dishwasher with Vinegar
Make sure the dishwasher is completely empty of all dishes. Then take a dishwasher-safe cup, such as a glass measuring cup, and fill it with vinegar. Place the cup with the vinegar in the dishwasher on the bottom rack and run the dishwasher on the hottest cycle. The vinegar will sanitize the dishwasher removing any odors that linger. If your dishwasher has a lot of hard water stains you may need to do this routine more than once.
4. Clean the Outside of the Dishwasher
Once the inside is clean, next you’ll want to clean the front of the dishwasher. Start by wiping down the top of the door that meets the top of the dishwasher. Then take warm soapy water and wipe down the front of the dishwasher. Then dry it all off with a soft towel.
When I clean my Frigidaire Gallery® Dishwasher regularly once every 2-3 months, I find that my dishes come out sparkly clean which saves me time. No more irritating little food particles to have to rewash! And I really love the soft rubbery prongs that keep my cups from banging all around while they are getting cleaned. It’s probably my favorite feature about my dishwasher.
Cleaning out your dishwasher not only helps with odors and ickiness, but it can also help your dishwasher keep your dishes coming out sparkly clean.
Frugal living is often looked at as something that can be picked up and dropped whenever someone wants to, but the truth is that living a frugal lifestyle is exactly that; a lifestyle. It is something that you will do on a daily basis for as long as you’re looking to save money. It is also often viewed as something that is hard to do. That couldn’t be farther from the truth, but it is very easy to overwhelm yourself if you’re new to frugal living.
These 17 frugal living tips for the frugal beginner are a great place to start if you’re new to saving money. Tackle them one at a time until you’ve got them all down and then move onto more advanced ways to save.
17 Frugal Living Tips for the Frugal Beginner
Buy Only What You Need – Obviously if you’re looking to save money, the very first thing you should do is to stop buying so much. Knowing the difference between a want and need is so important to living frugally. Buying only what you need and letting your wants wait until you can afford them will help get your frugal journey off on the right start.
Shop with a list – When you shop without a list, you end up buying things willy-nilly and adding whatever happens to look or sound good to your cart. It is a fantastic way to lose money. Instead, never step foot in a store without a list and you’ll save more than you could imagine.
Use cash envelopes – When you go out to run errands, do you often find yourself spending more money than you meant to? If so, cash envelopes are a great option. Fill your envelope with no more money than you want to spend. When the money’s gone? Your spending is done.
Use less – Along with buying less comes using less. When you use less in every area that you possibly can, you save more money. Use less soap. Use less gasoline. Eat healthy portion sizes instead of double. Use less water and so on. The more you can use less of, the more money you’ll save.
Make more – Again, along with buying less comes making more yourself. These days, you can buy the supplies needed to make almost every single item that you buy on a regular basis. Convenience foods, beauty products, cleaning products and more are all fantastic places to start. If you need ideas or help, Pinterest is a great place to search.
Learn to say no – Sometimes, especially if you’re a parent, saying no can be an extremely hard thing to do. If you can’t say no though, you’re very likely costing yourself quite a bit of money each month. Learn to tell people no when you’re not able to do something or spend money on something. Your budget will be much more comfortable.
Use coupons – Coupons are a great way to save money and if you’re not using them on products that you already use, you’re costing yourself money that you don’t need to spend. You don’t need to become an extreme couponer to save, but using a few here and there will only help your budget.
What other ways have you found to save money when you’re just starting your frugal journey? Please share so others can save too!
This homemade all purpose orange cleaner will not only save you money, the smell will have you craving cleaning your home with only 2 ingredients!
Can you believe spring cleaning is around the corner? Because at least for me time has gone so fast! Between all the Christmas shopping, the NYE celebration and the winter bundled up (+ the resolutions that are a staple around January) the months and days have come and gone so fast that I barely had enough to blink.
But with this new season coming around the corner I’m excited. It’s the time of the year that we do a deep cleaning, that we take the time to go through our stuff and Mari Kondo our heart out. But better yet, it’ the time of the year that gives us an excuse to DIY all the cleaning supplies we want.
Really, there’s nothing better than the homemade version of the cleaning supplies you need. They are chemical free, they smell great and honestly, they work as good as the ones you can purchase at the supermarket. Oh, and they are really cheap and frugal which is always a plus around here.
My all time favorite is this homemade all purpose orange cleaner. Simply put, it works.
Actually, it works so well that I don’t buy any other thing to clean surfaces. It’s tough on the stains and gentle on the surfaces and it smells delicious which gives it a definite bonus point and makes it a delicious spring cleaning product. seriously… can’t you smell how fabulous this is even by the photo!
The BEST Homemade All Purpose Orange Cleaner Recipe
And the ingredients? They are literal scraps!
Gather a mason jar, oranges, and white vinegar
Add your orange peels to the mason jar.
Add your white vinegar.
Close it up and give it a good shake!
Store in a dark cool place for 2 weeks and then remove the peel.
Told you this was an easy project!
I like to store it in a spray bottle or the mason jars and then just pour a bit of it on top of the surface that needs cleaning and rub it with a cloth.
Basically use it on top of the same things where you would use an all purpose cleaner.
This is a sponsored conversation written by me on behalf of SCHLAGE. The opinions and text are all mine.
You all know I love a good makeover, but now that my own home is complete, I’m running out of rooms to re-do! It’s a good thing I have no shortage of friends who are willing to let me bring my funky farmhouse style into their own homes. What do my pal, Tracy and I do with a day to hang out… refresh her bathroom of course! We did this DIY bathroom makeover in one day, for under $300! Just in time for her company to arrive.
Many people shy away from home renovations because it seems too daunting, or they don’t have the experience. Never fear… most of the biggest impacts in home decor, are small, easy and inexpensive fixes.
Tracy’s main floor bathroom is like many, on the smaller side and a bit dark. There was nothing “wrong” with it as is, but the paint was dark and dull, the light barely enough to light the room, and the hardware was a mix of gold, bronze, and white. She was really seeking to brighten it up and give it a fresh new look before her out of town family came for a visit.
We made a pretty hefty list of things we wanted to get accomplished for one day, but with the two of us and her two daughters being home from school (another snow day), we had plenty of helping hands and we set our goals high. We started by addressing the obvious things that were easy fixes.
Hardware & Fixtures: We needed to replace the ugly worn plain gold door handle, update the light fixture to something brighter, and replace the white plastic towel hanger. Upgrading door hardware is a quick, affordable and impactful way to express personal style.
Paint: Dark green… hmmm… not the best for a small space. My farmhouse chic style tells me we need to update with a fresh light modern gray and accent with some clean whites! For the white, we will paint the existing Maple cabinets to give them a new look and brighten the space. Don’t get me wrong. I LOVE maple, but in this small space, it was giving a yellow hue that made the space dreary.
Decor: One of the easiest and one of the most fun to shop for updates. There was an old broken shelf and dated photo on the wall that we would replace with fun decorative items in our accent colors and a super fun update to a plain old mirror by adding glass tiles.
What do you think?
Can we get this DIY Bathroom Makeover ALL done in ONE day?
Off to Lowes we go! We had an idea of what we wanted to do, but we needed to find all the hardware, fixtures, tools, paint and accessories to make it happen.
Well, who would have thought our whole design inspiration would come from new door hardware! We started looking for the new hardware first since it was literally the first thing we walked by in the store. Dollar for dollar, updating your door hardware makes a bigger impact on your home than many other afternoon projects and can match the other finishes in your home to complement your home’s unique style and décor.
Tracy was instantly drawn to the accent aged dark bronzed sleek style of the quality brand, Schlage. Schlage believes that style lives in the details because the details bring everything together in a home. Isn’t this Accent Lever beautiful! Best of all, right now you can get 20% off these amazing door handles at Lowes… SCORE!
Off we went to find the new light fixture, we used the color of the door hardware to guide us on the rest of the hardware for the room. We both instantly knew we had to have the farmhouse style light in the same finish with those amazing Edison Bulbs. BONUS… it has 4 lights compared to the existing 2-light fixture, so it’s sure to give the room a bright new look, AND was clearance priced!
Some paint, small glass tiles, a new shelf, some fun decor items, and we were set to get this DIY bathroom makeover started!
We decided the best strategy was to divide and conquer. While Tracy and I painted the bathroom in the new shades of gray, the girls took on painting the base and wall cabinet (white chalk paint), assembling the wall shelf, and putting together the new flower arrangements.
While the paint dried, we tried our hand at the hardware and fixtures. GIRL POWER! The four of us girls were left to install the Schlage door hardware, the new towel ring and the new light fixture. We both had a little experience in a few areas but had never done any of these things on our own. With each other for moral support, WE DID IT! and guess what… it was soooo much easier than I ever thought possible.
It literally took me 2 minutes to change the door hardware by myself and what a BIG impact getting rid of that ugly old gold thing!
We finished painting the cabinets, hung and decorated the shelf and then sat back and enjoyed a glass of lemonade.
The kids took over giving the mirror a new look with glass tiles and sticky tape while we relaxed. YES… it’s that easy!
Is it weird I want to just hang out in the bathroom all day? I just can’t stop looking at it and what a difference a handful of small, easy projects can do to make a really BIG impact.
Tracy is already asking me when I’m coming back over and bribing me with sweet treats so we can finish the whole downstairs. She’s even bought two matching sets of Schlage door hardware for the closet doors and has paint ready! (Pssst….. From 2/15/17-3/13/17, get 20% off your Schlage interior hardware purchase at Lowes online or in store!)Guess I better get into full DIY mode and have my screwdriver handy!
Follow Schlage on social media for more easy and affordable inspirations for your home:
Groceries are one of the biggest expenditures in most budgets, and you might be wondering how you can save a few bucks here and there on your groceries. If so, you’ve come to the right place! In this post, we’ll be talking about how to save money on groceries with some basic tips (and some unique ways you might not have thought about yet)!
Tips To Save Money On Groceries
1. Shop on Wednesdays.
Typically, Wednesday is the day sales start for grocery stores (although this may vary). Try to shop as close to the sale date as possible so you can maximize those savings by getting the things you need on sale before other people buy them out. Keep in mind that if you want something on sale during the sale week and you can’t find it, you can grab a raincheck to get it for sale price when it becomes available again. Rainchecks usually do expire, so be aware of that if you grab one.
2. Check for clearance!
Most grocery stores have a small section for clearance items that they need to get rid of. You’d be surprised how many goodies you can find in a grocery store clearance section! While the end goal is to save money on groceries, you might also be able to find toiletries and other items in the clearance section, so this is a good idea. We recommend stopping by the clearance section on every trip – just so you don’t miss out on anything!
3. Use coupons.
Of course, this is pretty common knowledge, but just a friendly reminder that you can save money on groceries in massive amounts by using coupons. Additionally, you can use apps like Ibotta and SavingStar to get cash back on your purchases to make the savings a little sweeter. Always check the apps to see what you can earn cash back on before you go shopping so you can double up those deals with coupons as well!
4. Meal plan before shopping!
When you lay out your meal plan for the week, look at the ad simultaneously! This way, you can plan your meals based on the sales. Meal planning can help you save money on groceries every week, especially if you’re including the ad in your decision making!
5. Buy store brands!
For the most part, name brands aren’t any better than store brand items. Some people have certain items they aren’t willing to budge on, and that’s okay too. Skip the name brands wherever you can to save money on groceries and cut costs drastically!
What other ways do you save money on groceries? Let us know in the comments below so we can share tips!
Don’t forget to check out all my “Money Savin'” posts too for great deals!
Saving money is no easy task. Sometimes it can be hard to do when you’re on a tight budget, but it is possible! These are some of our favorite tips and ways to save money that you might not have thought of yet – so keep reading!
5 Unique Ways To Save Money
1. Skip the restaurant!
If you’re trying to find ways to save money, dining out should probably be kept to a minimum anyway. However, if you want to go out for food one night, consider hitting a food truck or a local cafe instead of a fancy restaurant. Food trucks and small cafes can sometimes have meals for a fraction of the price!
2. Use everything in your pantry!
It can be easy to buy food and never end up using it causing the dreaded pantry build up! Instead of just forgetting about what’s in there, keep it to a minimum. Use as much as you can every week and don’t leave anything behind if you have the option! By cooking more at home and trying to utilize all the ingredients in your pantry, you’ll be cutting down on food waste and saving money every week!
3. Use gift cards!
Have you ever seen the deals at grocery stores where you can earn double points for buying gift cards? Take advantage of those! You already know you’re going to be shopping at the store for groceries anyway so rack up those points by buying gift cards for money you’d planned on spending anyway! Whether those points translate into gas savings or rewards, you’ll be saving money and this is a unique trick to help you save!
4. Visit your local beauty school.
If you’re due for a haircut or want to get a style, consider stopping by your local beauty school. The prices are extremely cheap in comparison to salons and the students could use the experience as well! If you’re really particular about your hair, this might not be one of your favorite ways to save money, but in a pinch, it is a lot better to spend less on something like a haircut. After all, it grows back!
5. Avoid ATMs.
ATMs can come with hefty fees for withdrawing money, so avoid them when you can! Instead, consider getting cash back when depositing your check and keeping cash on hand every month just in case you end up needing it. Of course, you likely won’t always be able to avoid ATMs, but any chance you can is money saved!
These are some of our favorite unique ways to save money. What are your favorites? Let’s discuss this in the comments!
Date night is important for any relationship, but you might be wondering how you can make time for each other without having to spend any money! If you’re on a budget or just trying to live a more frugal lifestyle, free date nights are definitely the way to go! There are a lot of different options for free date nights, so keep reading to get some ideas!
Spend it outdoors.
If you and your partner enjoy spending time outdoors, this is the perfect idea for a free date night! Whether you spend it taking a stroll through a park, camping, or just getting some fresh air, it’s guaranteed to bring you closer together! Weather permitting, you could also go for a swim together, go snowshoeing, or even hiking! Just pack a few snacks from home for your outdoor excursion and head out!
Make a trade!
Even if you find a totally free date idea, if you have to spend money on a babysitter, it can kind of put a dent in your budget! Consider trading date nights with another couple and trading babysitting services with each other so you don’t have to pay a babysitter or nanny! This is a great way to give back to each other and save money as well!
Consider a night in.
Of course, this post is about a night “out”, but sometimes a night “in” can be even better! Spend the night cooking dinner together! Sometimes spending a quiet night in is perfect for rekindling that spark and really focusing on each other. Whether you cook, order takeout, or even get a pizza delivered, pop on some Netflix or just spend the time enjoying each other’s conversation! This makes for a totally free date night (if you don’t order food), and can be some of the best quality time.
Volunteer!
Find something great to give your time to as a couple. Whether it’s your local humane society, a soup kitchen, or an elderly home, finding something to do together to give back to your community can both make you feel good and bring you closer together! Besides, you could really enjoy it and decide to keep doing it on a regular basis!
What other free date night ideas are your favorites? When is the last time you had a date night out? Let’s discuss in the comments below!
It’s that time of year again – your anniversary – and you might be stressed about giving gifts if you’re stuck to a tight budget! Financial worry is a pretty common tension point for many marriages, so you aren’t alone! Of course we know it’s the thought that counts, but sometimes you still want to get a gift that doesn’t appear cheap, right? Today we are sharing 9 budget anniversary gifts that don’t appear cheap so you can stay on track with your budget and also feel proud of the gift you’re giving!
1. A cross stitched wedding sampler.
If you have skill in cross stitch, this is a great idea! It is personal, unique, and something that won’t cost much to make. Make it unique by including things like your favorite sports teams or colors, a shape of the state you were married in, or something else that makes sense to both of you and maybe no one else!
2. A marriage clock!
Take the batteries out of a decorative clock and set it to the time you got married. You could write a poem around it or frame it in a shadow box with some other things that are important to your marriage. Aside from the cost of the clock, this is an inexpensive and thoughtful gift which is why it made our list of budget anniversary gifts!
3. A candy bouquet.
Candy is relatively inexpensive and if your significant other has a sweet tooth, out of all these budget anniversary gifts, this one might be the most appreciated! Consider using red vines to make it look creative!
4. Photo album.
Photo albums are relatively cheap to put together but the sentimental value is priceless! Whether you put together a digital photo album or a physical one with printed pictures, these memories are sure to bring a smile to your partner’s face.
5. Video with messages to your loved one.
This is one of the best budget anniversary gifts for those special milestones like “10 years”, “20 years”, and so on. Film a video message from close friends and family to celebrate your loved one and surprise them. They’ll certainly feel special and loved after that!
6. Plant a tree together!
This is great for those who love to be outdoors and celebrate nature. Plant a small tree in your yard and watch it grow throughout the years as your love does!
7. A Jar full of love notes!
This is one of the more simple budget anniversary gifts on the list – but definitely not the least thoughtful! Fill a jar full of love notes and sweet messages for your partner to read all year long. You can even fold them up and include things like “for when you’re sad”, “for when you’re going through a tough time”, etc. to make them for certain occasions and pick me ups!
8. A hand painted picture
Get in touch with your artsy side and hand paint a picture on canvas of a quote that means something special to you or really get creative and paint a landscape of a special place you share.
9. Chocolate lover’s bundle!
If your partner loves chocolate, consider making a chocolate lover’s bundle. Include all sorts of varieties of chocolate candies, hot chocolate mixes, and bundle it up in a cute chocolate emergency basket!
I love these budget anniversary gifts because they still say “I love you!” without emptying your pocket book! Also check out, “How to Have a Date Night Totally Free” for more budget friendly ideas!
What is your favorite anniversary gift you’ve ever received?
Ever wonder how to freeze quinoa? Well, I’ve got your back. Cooking and freezing quinoa in bulk is a great way to save money and more importantly time!
I’m not sure I have mentioned this on my blog yet, but recently my 12-year-old daughter had a food allergy test. And I nearly cried. She is allergic to wheat, oats, and even yeast! Wheat and yeast are seemingly in everything. I’m totally not a pro yet with making new foods without these ingredients, but I’m working my way into trying to figure out some foods she CAN eat. And quinoa is one of them! Yay! So I’ve been making ahead grains she can have like quinoa to freeze.
How To Freeze Quinoa
Here is all you ever wanted to know about freezing quinoa.
1. Cook the quinoa.
This goes without saying, but you’ll want to cook the quinoa first! Since you’re going to freeze quinoa, it’s a good idea to cook a larger amount so you have plenty to freeze (and eat if you’re cooking some to eat right now too). If you’re meal planning for a family, cook accordingly so everybody has enough. Cook according to package or to desired doneness.
2. Lay it out to cool.
You’ll want to lay out the quinoa and let it cool before you start portioning it to go in the freezer. You could certainly freeze quinoa all together but it’ll cut down on time spent in the kitchen during the week if you portion them out to individual servings. After they’ve cooled, start scooping them into the portions you want and then pour each portion into a sandwich or freezer bag.
Note: Make sure to squeeze the air out of the bags before putting them in the freezer!
3. Defrost!
After you freeze quinoa, you’ll want to defrost each pack individually as you use it. To defrost, either thaw at room temperature or in the microwave for 30-60 seconds. Once you’ve defrosted the quinoa, you can pair it with a salad, meat of your choice, or a sauce! However you decide to eat your quinoa, you’ll be able to do so in no time because the thawing process is relatively quick!
See how easy it is? Easy peasy.
Frozen quinoa can be used for a multitude of different recipes and make your meal planning much less time-consuming. Plus a little quinoa goes a long way, so that’s really nice too.
What are your favorite spices or recipes to use with quinoa? Seriously, I need to know!
Spring is upon us and it’s time to start that spring cleaning! Whether you’re just looking to tidy up a little or want to do a major overhaul, spring cleaning hacks are sure to help you save time and sanity! Today, we’ll be sharing some genius spring cleaning hacks to help you get started and ensure your success this spring. You’ll have your house looking spiffy in no time!
Spring Cleaning Hacks
1. Sections!
Start with one room at a time. If you try to clean the whole place at once, you’ll likely get overwhelmed and want to give up! Start with the room that has the most work to be done first. This way, if you don’t get through everything you want, you at least get the most important stuff done first. Most people find that starting in the bedrooms is easiest, because if you’re purging clothes, you’ll be able to take a lot out and clear up space for other things.
2. Cubbies!
Feeling like you have too much clutter? Cubbies can reduce the appearance of clutter while still allowing you to organize and keep the stuff you love. You can find a pack of cubbies on Amazon for relatively cheap, and you can even match them to your home decor!
3. Use a lazy Susan!
Getting ready to clean up the inside of your fridge? Use a lazy Susan to help you reduce spills and make things in your fridge more easily accessible. This will also help you avoid the dreaded forgotten food in the back, making it less likely you’ll have to deal with mold!
4. Don’t throw away the lonely single sock!
If you’ve got a sock without a match, don’t throw it away just yet! You can put it on your hand and use it to dust blinds easily and quickly. Make sure you start at the top so you don’t have to go over the same spots twice! After, you can either wash and reuse for dusting later or just toss it!
5. Clean under the bathroom sink.
Stuff is constantly getting stored under the bathroom sink, and spring cleaning is the time to get rid of things that have been there for a year (or longer!) and haven’t been used. Get rid of expired medicines, old bottles of soap or lotion, and anything you just aren’t using anymore! Once you clean under the sinks, you can make room for new things or better ways to organize like baskets and bins.
6. Clean that shower head!
Shower heads are often overlooked in routine cleaning, so spring cleaning is a great time to give it a good scrub. One of the easiest spring cleaning hacks around is to fill a small bag (think sandwich bag) with vinegar and attach it to your shower head overnight to soak. Use a rubber band or hair tie to keep it secured. Remove it in the morning and wipe it down for a sparkly clean shower head!
Which of these spring cleaning hacks will you try this year? Let us know in the comments below!
Freezing breast milk is cost effective, easy to do, and can be very beneficial to working moms or moms who need to be away from baby for a period of time! If you’re breastfeeding for the first time and aren’t sure about how to freeze breast milk – keep reading! These tips to freeze breast milk are easy to follow and extremely time efficient as well!
Tips To Freeze Breast Milk
1. Choose your container.
Some people choose to freeze milk in ice cube containers for older babies who have things like mesh feeders and such. This is one way to freeze breast milk, but if you’re looking to freeze more at a time or will be continuously freezing milk, you might want to consider breast milk bags. You could use something like sandwich bags as well, but typically breast milk bags are easier and most of them come with a douple zip lock, preventing leakage in the fridge or freezer. Most brands make similar bags, so just pick what’s cheapest or that works best for you.
2. Write the date!
Always write the date of your frozen milk somewhere. Whether you write it directly on the bag with a sharpie (something that won’t smear), or you write it down in a journal or on a sticky note somewhere, just make sure you know the date for each container! This will help you utilize the oldest milk first so you’re staying on top of the freshness of all of it.
3. Keep it all together.
It’s pretty easy for frozen milk to start taking over your freezer space if it isn’t organized well. If you’re not planning on buying an extra freezer just to store milk in, consider using a specific shelf or drawer in your freezer just for when you freeze breast milk and build up a stash.
4. Don’t refreeze!
Once you thaw milk for consumption, do not refreeze it. Thawed milk is safe for 24 hours in the refrigerator, so be sure to only thaw as much as you need and use it right away.
5. Freeze in small amounts.
Even if you ultimately end up freezing in breast milk bags, consider freezing in smaller amounts so you won’t have to thaw too much at once. The bags generally hold 6-8 ounces, but freezing in smaller increments like 2-4 ounces will allow you to thaw less at a time.
What other tips would you share for someone who wants to freeze breast milk? Let’s discuss in the comments below!
Mother’s Day is coming!!! Giving Mom a special day can get expensive if you aren’t watching what you’re doing. These 9 budget Mothers Day gifts show you care without breaking the bank and are a great place to start for anyone who might have a small budget but wants to give a gift that will be remembered year after year.
Personalize a Gift Basket – If your mother has a favorite thing, why not put together a gift basket filled with hand picked items (by you, of course) that is filled with those things? You could do her favorite snacks, spa products, movies and so many other options. Make sure that you include a handwritten gift note and that your gifts are only things that she will enjoy.
Write her a letter or poem – We live in a world where handwritten notes are being more and more rare so why not write your Mom a letter? Even better, take it one step farther and spend a month or a year writing a journal specifically for them? Give it to her on Mother’s Day and she will have something that she can come back to over and over again to remember how much she is loved.
Serve a quirky meal – Candlelit dinners are cliche’, but take those candles and make them quirky and you’ve got a memorable meal for years to come. Set up an in-house restaurant with you waiting on her personally, give some options for the meal and provide some cooking entertainment. You’ll get to spend time with your family and she’ll get a kick out of how “strange” the meal is.
Be cliche’ – On the other hand though, sometimes cliche’ isn’t a bad thing. Serve a candlelit dinner, buy roses, and write her sappy poem. Whatever you do though, make it memorable.
Give a wildflower bouquet – Roses are great, but some of the prettiest flowers are the ones that grow wild. Find a field near you and take the time to pick a bouquet filled with beautiful wildflowers. Your mother will appreciate the time that you took and you’ll have a cheap, but amazing gift to give. Just be sure to ask for permission first if you are going to pick on someone’s land. A bouquet of flowers isn’t worth a trespassing charge!
Get handy – If you’re handy with things like tools or at crafting, why not make your Mother’s Day gift? Do a little research and find what Mom has been wanting but couldn’t afford. Make it for her if possible.
Offer Service – Sometimes the best gift is one that is truly needed but the gift recipient won’t tell you that they need. This could be anything from help cleaning the house to a night away and anything in between. Pay close attention to Mom and if there’s a need they need fulfilled? Find a way to include that need into your gift.
Plan an evening of favorites – Another budget gift that is easy to personalize is an evening filled with her favorites. Plan her favorite meals. Do her favorite activities and even listen to her favorite music. The basic idea is to make everything about that night all about her and to pamper her like she’s never been pampered before.
Plan a box office bash – This budget gift is great for movie buffs, but will work for just about anyone. Plan an evening centered around movies. Serve several different flavors of popcorn and soda, watch her favorite movies, visit a film centered museum and do other activities that are all centered around the big screen. She’ll have a blast while relaxing at the same time!
What are some of your favorite budget gifts for Mom? Share in the comments below!
Graduation season is around the corner and it’s time to start prepping for graduation party time!
This year my twins will be graduating from high school. I know, I know! Crazy, right? It was only yesterday…..sniff, sniff. So this June I will be having my first ever graduation party at my new house. And I don’t even have my grass in yet. There is much to do. And I’m of course on a budget. So I’ve been researching ways to save money while still having a really great party. After all, graduation parties should be more about celebrating your loved ones rather than spending money. I know I’d rather spend more money on a graduation present or buying my kiddos college bound stuff. So hopefully these tips will help you and me stick to our budgets!
Tips To Have A Graduation Party On A Budget
1. Host a potluck!
Instead of spending a ton of money on food for the party, consider hosting a potluck! Most people don’t mind bringing a dish and this takes a lot of the financial stress off you, the host. It’s also a great way to get a nice variety of food! Even if you don’t need a ton of food for the party, you can have people bring things like drinks, paper plates, etc. to help out with the financial load!
2. Photos!
Instead of spending money on graduation party decorations at big box stores, make your own! Something like a string and a few clothing pins hanging black and white photos of the grad’s life all throughout the venue is a great way to get people reminiscing and celebrate your loved one’s accomplishments. I’m thinking about doing this one myself. You could also cut out cardboard in the shape of the year of their graduation and cover it in photos as a nice centerpiece!
3. Chalkboards!
This is a great way to stay on theme for your graduation party and you can chalkboard paint just about anything you have lying around! Turn old picture frames into chalkboards featuring the grad’s accomplishments, future plans, etc.
4. DIY invitations!
There are tons of expensive options for invitations everywhere but you can save a ton of money by doing them yourself. If you aren’t super artistic, there are free graduation party invitation templates online. If you have someone artistic in the family, consider having them whip something up for you on Photoshop or another graphic design program. I often check etsy.com for inexpensive templates as well.
5. Photo booth!
Consider setting up a small photo booth area for everyone to take fun pictures with the grad! This is a great way to create memories for them to look back on for a lifetime. Small props add a touch of fun to your graduation party!
What other things do you like to add to your graduation party celebrations to make memories? You doing a grad party this year too?
It’s a big expense that comes fairly often: tires. Replacing your tires is important, and if you’re trying hard to stick to a budget or save money, finding a great deal on tires is important too. The hardest part about finding a deal on tires is knowing where to look. If you want to learn how to save money on your tires too, keep reading!
How To Find A Deal On Tires
1. Shop around!
Whenever you’re looking for a deal on tires (or anything), it’s a good idea to shop around and compare prices before committing to make a purchase anywhere. Make some calls before you head out to get your tires replaced and see what prices are like at different dealers and stores. Make a notepad of all the prices you get to compare – and also ask if they do price matching for anywhere else!
2. Consider used tires.
Depending on what your budget is like, you might want to consider looking for used tires. You can find them on places like Craigslist and Facebook – but make sure to have someone with you when you’re meeting up with anyone anywhere. Additionally, inspect the tires before you pay to make sure they’re still usable! This is a great way to drastically reduce the costs of your tires and can also hold you over until you have more saved up for new tires as well.
3. Check online!
Shop around online for a deal on tires too! If you can install them yourself, that’s great too and will help you save money for installation. If not, many online tire shops will ship the tires directly to a mechanic for you so you can have them installed. Checking online is also a great way to research types and brands of tires so you can figure out what tires you need or want.
4. Keep the date in mind!
If you’re looking for a deal on tires – try to hold out until October or April if you can. Often times, tires will get marked down in preparation for winter and again when the weather starts warming up.
It’s important to take care of your tires all year long so they last longer and you’ll be able to use them more. Make sure whenever you’re buying tires that are used that you’re checking the dates to make sure they aren’t too old. By following all these tips, you’re sure to find a great deal on tires to save you a load of money!
Love gardening but are limited in your space? You can still garden friend!! Here are some awesome ideas for creative gardening for small spaces.
Gardening For Small Spaces
1. Kitchen garden!
If you’re looking to grow herbs and other things for your cooking, consider a kitchen garden. Whether you just put a few potted plants in a window sill or you create an entire herb garden, this is a great idea for gardening for small spaces. If you have access to a pallet, you can create an entire space for your herbs on a wall, however big or small you want it.
2. Hanging plants.
If you don’t have the wall space or outdoor space for a garden, consider hanging plants for your garden! Gardening for small spaces, especially in places like studios or small apartments, can be tough. Hanging plants doesn’t take up any window room or wall space and can give a nice aesthetic to your decor!
3. Tiered planters.
For those with small outdoor spaces who want to keep their gardening outdoors, consider using a tiered planter. This way, instead of spreading out your garden, it just goes up, instead of out! Tiered planters are a great use of space for those gardening for small spaces.
4. Use railings.
Have a patio with rails? Use them for gardening for small spaces! Hang baskets or pots along the rails to give a nice look to your patio and also allow for your garden to grow, get fresh air, and plenty of sunlight!
5. Plant a variety.
If you create a space for herbs, consider planting several varieties together. This way, you don’t have to have a container for each one, and you can have your herbs easily accessible in one place! You can plant certain vegetables together as well – just make sure to read up on which ones can be companion planted first so you don’t plant any incompatible plants together!
6. Ladders!
This is another excellent resource for layering a garden vertically to save space. If you have an old ladder, convert it into a small garden with containers on each step! It gives your garden a chic rustic look as well!
It’s almost time to spoil those wonderful fathers in your life this Father’s Day! Without having a large budget, it can feel tough to spoil them and show them you love them, but have no fear! Today we’ll be talking about budget friendly Father’s Day ideas that will make any guy feel special!
Budget Friendly Father’s Day Ideas
1. Portable speaker!
If you’ve got a dad who loves to be out in the garage or his workshop, give him the gift of music! With portable Bluetooth speakers, he can jam out anywhere with his favorite music! Portable bluetooth speakers are relatively cheap now and you can find them at Walmart and Amazon for a great deal!
2. Grill master!
Got a dad who loves to grill? This Father’s Day, spoil him with some new grill tools, a cool grill apron, and some new seasonings to use with his grilled food! Put together a basket for under $40 and show him you love the food he makes just as much as him!
3. Photos.
There are so many different gifts you can create with photos for the dad who loves photos and memories! Places like Walmart have tons of options from pillows to mugs, and if you want to create a long lasting photo memory for your dad this Father’s Day, it’s easier than ever to do so!
4. Relaxation!
For the hard working dad who deserves some time to relax, consider putting together a gift to help him do so! You can include things like slippers, new pajamas, a nice comfortable pillow or blanket, and some of his favorite soda!
5. Car wash kit!
If you’ve got a dad who loves his car, consider putting together a bucket full of car wash and detail supplies so he can treat his car too! Fill it with sponges, rags, soap, and wax! This is sure to make any car-loving dad feel special.
Father’s Day is a great day to spoil that special dad in your life but it doesn’t have to be all about money! After all, it’s the thought that counts and these gifts are all thoughtful!
Got any other creative budget friendly ideas for Father’s Day this year? Share in the comments below!
Got a fruit fly problem? Have no fear – today I am sharing the best natural fruit fly trap using vinegar! It will save you, promise.
Last week when I canned peaches using my no-refined sugar recipe I noticed a fruit fly. Well overnight that one fruit fly turned into 20. And then 40. Seriously…what is up with how fast these little fetchers breed? Before I knew it I was doing the icky dance, batting fruit flies away every time I opened my pantry. I knew that the breeding needed to stop and these fruit flies needed to destroyed.
My parents always used vinegar and dish soap to kill them little buggers. Unfortunately at that moment they were traveling and I couldn’t get a hold of them for their recipe. Luckily on that same day I got an email from a reader named Stephanie who shared her recipe for a fruit fly trap using vinegar and dish soap.
How to make a Natural Fruit Fly Trap Using Vinegar
Take a jar and fill it 1/2 or 1/3 full of apple cider vinegar. Next, gently mix in a few squirts dish soap (maybe a teaspoon amount) so there are no bubbles. Then, leave it on your counter overnight near where you see them. In the morning there will be drowned fruit flies in the bottom of it! If the first night doesn’t catch them all make a fresh batch the next day to catch the stragglers.
How this works is the apple cider vinegar smells like rotten fruit to the fruit flies and attracts them. The liquid dish soap breaks the surface of the vinegar and sucks them in when they try to land, which drowns them.
Now I am a lover of most creatures besides spiders, grasshoppers and flies of all kinds. So it still saddens me a little that I am having to kill these little fruit flies, but if I don’t they will breed and infest quickly. This method is natural and non-toxic so if my kids come by and happen to grab the jar off the counter it shouldn’t hurt them.
So it’s bye bye, fruit flies! Hope this recipe helps you out.
Camping is one of the best parts of summer. I love being with my family, communing with the outdoors and just living the good life without all the distractions. You would think going camping would be a very thrifty activity, but costs can add up quickly if you are not careful especially when food is concerned. So I decided to share my family’s favorite cheap camping meals and yes, dessert is considered a meal in my book!
Here are 10 Easy and Cheap Camping Meals.
1 – Pancakes – I love hot pancakes in the morning but I have found they taste even better when the work is done for me. Before I leave I whip up a recipe of my homemade buttermilk pancakes and put it in a gallon-size Ziploc bag to freeze overnight. I like to freeze it flat so I can pack it easily in my cooler. By the time you need it, the batter is thawed and ready to use. Bunch the batter in the corner, cut the pointed end and you have a dispenser for perfectly formed pancakes, too! Throw some syrup on those pancakes and the meal is done for you!
2 – Egg sandwiches – These egg sandwiches are not just for your everyday home use! They are amazing when they are warmed in the fire, too! Just make them and freeze as normal except wrap them in foil instead of plastic wrap. Add them into your cooler and in the morning warm them on a grill or on the coals. Make sure you don’t walk away because they don’t take long to get warm and ready for you to eat! I like the individual portions so everyone gets a good breakfast even if they get up at different times.
3 – Omelets in a bag – Using gallon-size Ziploc bags and boiling water you can make homemade omelets for your whole family. Crack the eggs into each individual bag–I like to use 2 eggs per person. Then add in what I like to call the “cleaning out the fridge” toppings–peppers, onions, cheese, ham, sausage, spinach–whatever you have on hand. Add them to the cooler and in the morning boil a large pot of water. Drop each bag into the boiling water and cook them for about 12-13 minutes. After the allotted time, carefully pull out the bags, slide the omelet on to your plate and enjoy!
4 – Campfire Pizza log – This recipe is a crowd pleaser every time I make it. Roll out your pizza dough into a rectangle. You can make your own or use the refrigerated pizza dough. Add in 1/2 cup of tomato sauce, 8 ounces mozzarella cheese and any toppings your family likes. I also take the opportunity to use up those veggies and meats from my fridge! Starting at one end roll the dough up like you are making cinnamon rolls and pinch all ends to create a seamless log of pizza goodness. I also like to throw a little parsley on the top for a pop of color! Wrap it in foil and freeze it. It will help keep things cool and will thaw and be ready to cook by dinnertime. You can cook it on a grill or just put it in the logs for a total of 25 minutes, flipping often. Once it is done, cut or pull it apart and serve. Fresh pizza is a rare commodity while camping and will be gobbled up in seconds!
5 – Taco soup – Easy taco soup is made by using 2 cans of stewed tomatoes, 1 cup frozen or canned corn, 2 cups of homemade beans or canned beans, 1 packet taco seasoning, and 1 lb cooked ground beef. Throw it all into a pot and cook it together. Cool it and freeze it into resealable freezer bags. When it’s frozen add it to your cooler. When you are ready for your meal, dump the contents into a pot and bring it to a simmer. Bring along a small bag of Fritos to add on top and dinner is ready!
6 –Campfire Sandwiches – This is great for lunch or dinner and uses a loaf of French bread, ham, cheese slices, butter, mustard. You could substitute different meats and cheeses, too. Without cutting all the way through the loaf of bread, cut 12 slices about 3/4 inches thick to create 6 sandwiches. You should cut it to about an 1/4 inch from the bottom of the loaf. Stir together 3 TBS of butter and 1 TBS mustard and spread the mixture on every other slice of bread. Fold the cheese slice in half and add the ham in the middle. Stick the ham and cheese into the slots. Wrap the sandwich in foil. You can freeze this or just add it to the cooler. Place on a grill or in the coals where you will turn it frequently. Cook the sandwiches about 20 minutes or until the cheese is melted and the loaf is nice and hot! Remove foil from the loaf and pull apart the sandwiches.
7 –Curly dogs – This is a great way to change up the regular hot dog dinner. All you need is hot dogs and a package of crescent rolls. Wrap the crescent roll around the hot dog and roast it until the dough is cooked and the hot dog is warm! It takes about 10 minutes for the dough to cook all the way but it is definitely worth it!
8 – Campfire roasted apples – This is an easy and yummy dessert with just 4 ingredients–apples, cinnamon, sugar and butter. Core and slice your apples so that they can still fold up to the apple shape. I used an apple slicer but a sharp paring knife does the trick, too. Transfer the apple to the foil and use the foil to help keep the apple shape. Sprinkle sugar and cinnamon an all the apple slices and then add about 1 TBS of cut butter slices into the center of the apple. Wrap the foil around the apple so it forms a secure package. Add the apples to the coals, turning sides about every 5 minutes. Roll it out of the fire and let it cool for a couple minutes and then dig in and enjoy!
9 – Campfire eclairs – This is a new dessert that my kids have enjoyed making and I love that it only has three ingredients — a package of crescent rolls, cool whip and chocolate frosting. Wrap your crescent rolls around your hot dog sticks making sure that it is closed around the end of the stick. Hold over very hot coals, constantly turning so it doesn’t burn. It takes about 10 minutes to cook all the way through and will come off the stick easily when it is done. Fill with the cool whip and frost the top. You can switch up the variations of the filling with different flavors of pudding, too!
10 – Cake in an orange – This cake is cooked in an orange! Cut the top of the orange off and scoop out the flesh. Take your time with this part because you want to be able to put the orange back together again without the orange flesh. Fill the orange with prepared cake mix or your own homemade cake batter leaving room for it to rise. I fill it a little over halfway full and it has worked every time. Put the top of the orange back on and wrap it in foil. Tuck it around the hot coals for about 20 minutes turning about every 5 minutes. Even though it smells delicious let it cool for about 5 minutes and dig in!
Do you have any favorite recipes we can add to these cheap camping meals?
If you like camping recipes try out these great recipes.
Disclaimer: this post has been updated with new images and ideas with special thanks to my sponsor, Frigidaire Gallery®. I love this post and continue to make ahead my kids cold lunches to save time and money!
It’s morning. You’re tired, and moving slow. Your brain is trying its best to remember all the morning tasks and get the kids off to school on time. About 5 minutes before the kids head out the door you remember you need to make their cold lunch. And then it’s crunch time. You worry if they’ve even remembered to brush their teeth as you open the fridge to see what they will be having for cold lunch. With not enough time…it’s either going to have to be hot lunch again or another boring peanut butter sandwich.
Sound familiar?
This was pretty much my life for the better part of my kids growing up. Always rushing, feeling like it was just too much hassle to do the whole “cold lunch” thing. Money was tight but so was time. I wanted my kids to have a healthy lunch but struggled with variety, time and preparation. I would usually do really well for the first few weeks of school and then get lazy. I found that if I didn’t prepare the night before, it was a mad rush in the morning where I found it easier to just say, “You’re getting hot lunch today!”
But now I have a method that really works. I have been making a week’s worth of cold lunches all in ONE day for a few years now, and it is the best thing for busy moms! This method has totally saved me.
ALL IN ONE DAY
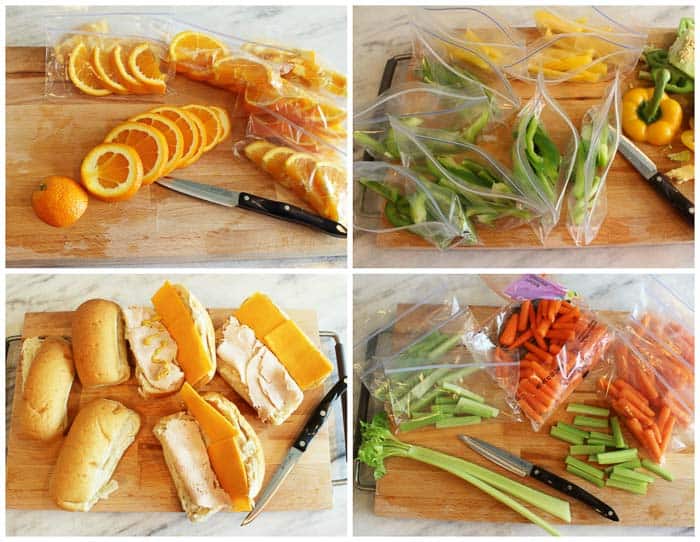
So how this works is the following: Once a week I chop and bag up all the fresh fruit, vegetables, crackers and any other lunch items all at once. Then I add them to 3 different cold or dry lunch buckets to store in my fridge, freezer and pantry. The kids can quickly grab the items to throw in their lunches themselves in the morning or evening before and my work is done. Takes all my stress away.
THE MAKE AHEAD LUNCH BINS
Dry Goods Lunch Bin
The dry good lunch bin currently sits in my pantry. It’s simply a plastic tote bin. It’s filled with individual bags of dry lunch items such as bagged pretzels, crackers, homemade granola bars, trail mix, treats and more. Here is a list of ideas and dry lunch items we have done in our lunches:
Store-bought or homemade crackers
Pretzels
Pre-packaged Fruit Cups or applesauce Homemade Granola or Trail Mix Homemade Granola Bars
Popcorn
Nuts (if your school doesn’t ban for allergies)
Beef Jerky
Chips
Graham Crackers Homemade Cookies or brownie bites (bake a big batch and individually bag them up)
Special Treats ( usually for a holiday)
Cold Refrigerator Lunch Bin
The cold lunch bin sits perfectly in my new Frigidaire Gallery® All Refrigerator. I have owned this appliance for a few months now and I LOVE how much space I have. Having this extra room in my fridge has saved my family time and money and has made it feasible to feed my kids healthy cold lunches on a regular basis. One of my favorite features is that it has an alarm on it if the kids leave the door open (which believe it or not has come in handy). And when I need to raise or lower the temperature it’s as easy as pressing a single button. Seriously it’s my favorite appliance in the house! And everyone that visits me comments on how cool it is and I have to agree. If you are looking to upgrade your appliances or build a new home in the future I would absolutely consider this amazing built-in set.
The cold lunch bin holds all the cold lunch items that need to stay refrigerated. Once a week I will separate grapes, chop oranges or apples (if I did apples I would first soak them in pineapple juice or fruit fresh so they keep longer), and chop carrot or celery sticks. Some of the items I have kept in my own personal cold lunch bucket this past year are:
String Cheese or mini Babybel cheese
Yogurt smoothies or other yogurt cups
Carrots (I found little cups with lids at Cash n Carry that I add ranch dip to)
Sliced apples (soak for 10 minutes in pineapple juice or fruit fresh so they don’t go brown) Homemade pasta salad
Sliced oranges
Mandarin oranges, whole
Green peppers, sliced thinly
Celery sticks
Grapes, cherries, cantaloupe or other seasonal fruit cut up
Green Salads Turkey Pesto Rollups
Mini cups of hummus
Mini cinnamon streusel, blueberry, lemon poppyseed or even savory muffins
Frozen Freezer Lunch Bin
I typically just fill up my bin in the freezer with sandwiches or frozen homemade yogurt tubes.
I have found that the easiest way for me to make the sandwich part is to take a large roll or sandwich bun, add in meat and cheese only, wrap and freeze individually. My children will take them out in the morning frozen, add them to their lunches and by the time it’s lunch at school the sandwich has thawed. If they must have the condiments on their sandwiches, you can always add them in between the meat and cheese as it won’t penetrate the bread and make it all soggy. But don’t add in your lettuce or it will be a gross slimy mess. If your child likes lettuce, pickles, peppers or anything else on their sandwiches you could always make up individual bags of sandwich fixings and add it to the cold refrigerator lunch bin. Wraps and quesadillas will also freeze really well (my kids will eat them cold.) Things to add to the freezer bin:
To figure out how many to bag up for the week, I count out the number of days for cold lunch that week times how many children. Here is my own personal math: 4 kids x 5 days = 20. 20 bags of various chopped vegetables, 20 bags of various chopped fruit, 20 bags of chips/crackers, 20 string cheese or even treats if I feel nice that week..hee hee. 20 Sandwiches, quesadillas, or other main dish options. So I make everything all in one day then I’m all prepared.
WANT TO BE MORE “GREEN”?
One idea is to buy a bunch of re-usable sandwich bags. They can be expensive to buy a bunch, but it is better for the environment.
Or you could use bento boxes or plastic containers. You would just prepare the lunch ingredients in advance use a few larger gallon sized bags and fill them with all the carrots, string cheese and other items. Then you can quickly fill the bento boxes or containers the morning of.
For me while I want to be green, I am also on a very tight budget. So when I look at spending $2.00 for 100 little plastic baggies versus having to spend hundreds on re-usables, well… it’s tough. So I will be trying to buy a few re-usable bags or container each month and slowly reduce my waste in the world. You just do what you can! Every little bit helps.
Have you tried making your cold lunches once per week using this method? Got any other great food ideas for kids, teens or even your husbands’ lunch?
Did you know you can freeze salsa?! Let me say that again…you can freeze salsa! We just took money saving to a whole new level, people!
Salsa is definitely a staple in my house. Oh! Who am I kidding? Salsa is the number one, go to, condiments of my household! Not only is it delicious when you are dipping your chips in it, but it makes an amazing base for freezer meals of all kinds.
There is one thing that bugs me about salsa though… the container always seems to get pushed to the back of the fridge, and often times about half of the salsa goes bad before I manage to find it again. Well, you know I can’t handle food going to waste in this house. That means money in the trash, and I ain’t havin’ it!
Imagine my pure elation when I realized I could freeze salsa. It’s no secret, I live for this kind of thing. I mean, Freezing Salsa…it’s just so simple! Honestly, not sure that money saving can get much easier than this, folks.
I also have come up with some great little tips and tricks to share with you just to make sure that you are getting the best results possible when freezing your salsa. Now, you can have wonderfully spicy salsa anytime, and you won’ t have to inspect the container, or do one of those weird smell checks ever again! Hooray for money saving!
How To Freeze Salsa
1. First, pick a favorite salsa recipe!
Whether you have a tried and true favorite or you’re on the lookout for a new salsa recipe, pull one up and get ready to make it! Make sure you have all the ingredients on hand and any tools you’ll need to make it. If you don’t have a favorite recipe on hand, feel free to search Pinterest for some quick and easy salsa recipes!
2. Cook it down!
When you freeze salsa, you don’t normally just throw it in the freezer as is. You’ll need to cook it down to thicken it up. Let it simmer until some of the liquid evaporates or simply add some tomato paste in with the salsa to create a thicker consistency. This step is important so make sure you do this before throwing it in the freezer!
3. Prep for the freezer.
Now, you can get your salsa ready for the freezer. Start portioning it in freezer bags or containers (it’s up to you based on your preference and how much freezer space you have) that you have ready for the servings and don’t forget to leave some space at the top to allow for any expansion. Don’t put hot salsa in the freezer – make sure you let it cool completely before freezing!
4. Drain!
When you thaw salsa for use, there might be a little extra water on the top because it was frozen before. You can either drain it off if you want to get rid of it or just leave as is! If you’re cooking with it, just leave it as is, but if you’re just using it for a dip, you may want to drain the excess water to get the consistency just right.
Now you’re ready to freeze salsa for all your salsa needs! What is your favorite kind of salsa? Let us know in the comments below!
A Maytag sponsored review and my own personal testimony regarding my recent upgrade to a Maytag® washer and dryer.
How To Choose A Washer & Dryer Set that is Best for You
There is nothing more frustrating than trying to purchase a new appliance. There are sooo many different varieties that my brain goes on automatic overload every time I think about what I should buy. Do I need a refrigerator that has a built-in hot cocoa maker (if that exists)? Does my dryer need steam refresh? Should I get a front-loading or top-loading washing machine? Ahhhh!!! This doesn’t even factor in the thoughts about the cost, the brand, the color, etc.! So, how exactly do you make such an important decision? You do your research of course!
With my recent upgrade to my new Maytag® washer and dryer, I scoured the internet for the top brands, the best models and the best prices available. I want to share a few tips I picked up along the way. I hope it helps you find a good deal and save some of your sanity…
Choose a Model that Has Everything You Need and a Little of What You Want
With so many options out there, the first thing I suggest doing is to choose all the things you really need first, then look at the other fun options after.
When you are thinking about buying a new washer or dryer, take into consideration:
The size of your laundry room
The size of your family
Your dedication to washing clothes
If you have a smaller laundry room, a large family and massive loads of clothes to do each day, then a Maytag front load washer and dryer is a great option. They tend to hold larger amounts of clothes so you can tackle your laundry in a smaller amount of time. Front load laundry sets can also be stacked on top of each other, which is a perfect arrangement for small laundry rooms.
Know What Cycles You Need
Most washers will have your standard cycles, but if you have an active family or a husband that has a stain- or mess-prone job, you may need a little something extra. You may want to choose a washing machine that has a pre-soak cycle or a heavy-duty cycle that will attack those stubborn stains. While I was shopping around, I noticed that Maytag offers a washing machine that goes beyond the norm when it comes to optional cycles. Their latest front load washer helps eliminate odors with the Fresh Hold option. So, if you forget and leave your clothes in the washing machine, it’s no biggie! The Fresh Hold option keeps your clothes smelling fresh for up to 12 hours after your laundry is done!
If you tend to leave clothes in your dryer or hate to iron (guilty!), then I strongly recommend a steam refresh to get out all those wrinkles! My Maytag dryer has a Refresh cycle that uses steam to not only get out wrinkles but it will also remove odors. One thing I have learned lately is that you definitely need a dryer that can keep up with your washing machine. I do not want to have to start round two in my dryer when my washing machine has a new load of clothes waiting to go in. I love that my new dryer has enough room that I can put in extra-large loads and still have plenty of space for the air to flow and dry ALL my clothes evenly!
Shop Around: Find Deals!
If you have a budget, it is important to shop around for great deals. You want to get quality products without breaking the bank. Be sure to do research and find some awesome deals by looking on the brand websites themselves.
If you are looking to purchase new appliances, I strongly recommend checking out Maytag. With more than 100 years of appliance greatness and these great deals, shopping Maytag in May sounds like a no-brainer to me!
My Research & the Maytag Laundry Set I Picked
Now to give you some history and my laundry appliance back story! My last washer and dryer set were on their last leg. The washer was completely off balance and showed an error signal with every wash, and my dryer took two cycles to dry anything and had a super loud banging sound whenever it was drying. It was definitely time to upgrade. You know it’s bad when you haven’t seen the bottom of your laundry room floor in 2-3 months.
To begin my research, I scoured the internet for the top brands, the best models and the best deals available. I read all the laundry reviews from tons of review sites. Then I went to Facebook and asked all my FB friends if I should go with a front load washer/dryer set or a top loading washer/dryer set. And many people shared their opinions with me and experiences. It’s so funny to see how passionate my friends get about their laundry appliances!
So after all the research, opinions from friends & family and even praying about it, I picked a Maytag Front Load Washer (MHW8200FC) and a Maytag Large Capacity Dryer (MED8200FC).
What I love about my new washer:
It’s quiet! With my laundry room on the second floor of my home, I was worried about the spin cycle shaking the house but with this washer, it’s been smooth spinning, and I think it’s a very quiet machine!
Its PowerWash cycle with the internal heater is ah-mazing! This washer is cleaning my clothes better than I’ve ever seen any washer do before… and my clothes smell so fresh too.
I am one of those people who always forgets to change over the wash right away… so, like I mentioned before, I love the Fresh Hold option which tumbles the loads and circulates air with a built-in fan up to 12 hours to keep clean clothes smelling fresh after the wash cycle ends.
What I love about my new dryer:
My clothes actually dry in one cycle! With optimized heat and airflow (and a nice big 7.4 cu. ft. capacity) the PowerDry cycle gets your toughest loads completely dried fast! And I always use the Refresh cycle with Steam – I love that I can easily revive my clothes and get the wrinkles out.
I’m telling you guys, having this new Maytag washer and dryer set is amazing.
And now… my laundry mountain is gone for the first time in months. I can finally see my laundry room floor!!
There is nothing as disappointing as going into the freezer for that ice cream you have been saving just to discover that it has formed ice crystals. Or finding your package of meat discolored with gray spots. This is caused by freezer burn.
Freezer burn is a common issue that can lead to wasted food and leave a dent in your grocery bill. It can happen to any frozen food, but what is freezer burn?
WHAT IS FREEZER BURN?
Freezer burn is what happens when the liquid inside your frozen food begins to evaporate, which dehydrates the food, leaving dry, grayish looking spots or icy crystals behind. This is when moisture escapes your food leaving it dry, rubbery, and lacking flavor.
There are many factors that can cause freezer burn from excess air in packaging to fluctuating freezer temperatures.
THE SCIENCE OF HOW FREEZER BURN HAPPENS
Just like our human bodies are made up of 60% water, your food also has a lot of water in it. When food is placed into the freezer the water inside the food wants to migrate to the coldest places.
Once the water moves to the top of the food it can become ice crystals. Those ice crystals begin to evaporate (a process called sublimation where a substance goes directly from the solid to the gas phase without turning to liquid first).
When water evaporates it leaves dry, grayish spots on meats, vegetables crusty and tough, and forms that thick frozen slimy film on top of your ice cream. Ewww, right?
These evaporated molecules can go into the air of your freezer, combine with other molecules from other foods and sometimes come back into your food again, making foods taste off or unpleasant. This is why proper packaging is vital for preserving food in your freezer.
DO ICE CRYSTALS MEAN FREEZER BURN?
When moisture from the food moves to the top of the food it changes into ice crystals.
These ice crystals can evaporate and re-freeze on the insides of packages or containers. This indicates that the food either went in at a warmer than the desired temperature, or moisture has come out of the food causing it to be dehydrated in spots.
When you see ice crystals on food, it does generally mean there is freezer burn happening on your food and can be a great warning to use the food up before the flavor can change too much.
WHY IS MY FREEZER CAUSING FREEZER BURN?
Unless your freezer is broken it generally is not the cause of freezer burn.
The real cause of your freezer burn is often user error. This can be from opening your freezer too often, setting the temperature too low, or packaging your foods with too much air or in packaging that is not airtight.
To check if it is your freezer causing freezer burn, check the seals to ensure that your freezer seals all the way around.
Get a freezer thermometer to check the temperature of your freezer to be sure that it is reaching the sub-zero temperatures needed.
To prevent freezer burn you want to keep your freezer below zero. This is why deep freezers give food a longer storage period than a freezer attached to your refrigerator unit.
Opening the freezer can cause warmer, moist air to enter the freezer. This may also become frost or ice crystals on packages as the air is cooled. Try to limit the number of times the freezer is being opened. You can use child locks to help remind your family to check that the door is closed when they are done using the freezer.
WHAT DOES FREEZER BURN LOOK LIKE?
People often ask me how to tell if chicken is freezer burned? Or what about freezer burned vegetables? Freezer burn can look different for different kinds of foods.
Sometimes it will appear as gray or white colored dry spots and can have a collection of ice crystals around it. Sometimes it can also look slimy or create a shiny film, like what you see on freezer-burned ice cream.
Here are some different images of freezer-burned foods.
Freezer Burn Meat: Meats like steak, ground beef, and pork often get grey spots where freezer burn has taken hold. This will have a less than pleasant taste and rubbery texture.
Freezer Burn on Chicken: Freezer burnt chicken can take on an old leathery texture and turn a dull off white or even fully white color. Look for dry spots that can happen and ice crystal spots.
Freezer Burn on Vegetables: Freezer burnt vegetables turn into a solid block from the moisture causing everything to melt together. You will also see plenty of ice crystals formed in and around freezer burnt produce.
Freezer Burn on Ice Cream: Freezer burn ice cream can take on a thick rubbery slime-like texture with ice crystals on top. This is common on the edges of your ice cream from when the temperature fluctuates in your freezer.
HOW TO TELL IF FOOD YOU BUY AT THE STORE IS FREEZER BURNED?
When you pick up a bag of frozen vegetables, if the inside feels all clumped together in one big lump, it’s probably got freezer burn. In this case, skip that bag and grab another one.
Look for grayish dry spots or ice crystals on food with see-through packaging to avoid freezer burn steak, chicken or other meats. Skip over these selections in favor of fresher food with no discoloration or ice crystals.
IS IT SAFE TO EAT FOOD WITH FREEZER BURN ON IT?
Is it safe to eat freezer-burned food? Yes, actually, it is safe to eat food that’s been freezer burned. Freezer burn is basically food that is simply getting dehydrated. However, the texture can be dry, rubbery and chewy and you might notice an unpleasant flavor when you taste it.
CAN YOU GET SICK FROM FREEZER BURN FOOD?
No, you can’t get sick from eating properly prepared food that has freezer burn on it. Food that’s frozen at 0 degrees or less doesn’t grow bacteria, so it can’t spoil or begin to rot. Freezer burn is food that is simply getting dehydrated, not growing bacteria.
HOW TO GET RID OF FREEZER BURNED TASTE?
If you are going to be eating freezer-burned food, make sure and cut off any freezer burned dry spots or sections first, especially on meat. Rinse off the ice crystals, and thaw as usual. Then you can cook & eat the food as directed.
For freezer-burned ice cream, simply cut off the top film or area that is freezer burned.
Sometimes by removing the freezer burn areas, you won’t notice a difference at all. However sometimes, depending on how long something has been freezer burned, it may still have an unpleasant taste or slight flavor changes still.
Meats can often be saved from issues after falling prey to freezer burn by being cooked in a slow cooker for 8+ hours or ran through the Instant Pot to rehydrate, tenderize, and flavor the meat with herbs and spices deep into the affected meat.
HOW TO PREVENT FREEZER BURN?
There are several ways to prevent freezer burn from using food sealing machines to just freezing food quickly. To read them all check out my in-depth guide 13 Simple Tips to Prevent Freezer Burn.
Two of the biggest mistakes I see people make when freezing food are not removing the air from the bags or containers before freezing and putting hot food into the freezer. Let’s talk about how doing these two things correctly will help you prevent freezer burn.
1. GETTING THE AIR OUT
Air is the enemy to freezing food. If you remove the opportunity for moisture to evaporate you will not get freezer burn.
Using a vacuum sealing machine will give you the best results, but those can be rather pricy. Instead, if you are using freezer-safe bags, just press all the air out of the bag before freezing.
Also be careful not to get dings or holes on your frozen food bags or air will get in and create it like in the ground beef picture above.
If you are freezing items in baking pans or containers, use a piece of plastic wrap to cover the food first, pressing down to remove the air. Then finish off by wrapping the pan in aluminum foil or adding the container lid.
2. FREEZING MEALS QUICKLY
To avoid having extra moisture evaporation make sure you don’t add food that is hot to the freezer. The steam will evaporate and turn into ice crystals.
For best results cool your food completely to room temperature or place in the fridge until cool then place in the freezer. Ideally, you want your food to freeze solid within 2 hours to avoid it.
You bet it does! The vacuum sealer machine bags are made specifically to keep air from coming in and out of the bags. This makes it so moisture cannot leave the food or evaporate out, thus preventing freezer burn.
Note: Regular store-bought plastic freezer bags are made from polyethylene, which moisture and other gases can get through. That being said, I still freeze my meals often in freezer-safe bags, getting as much air as is possible out and have gotten little if any freezer burn this way.
If you have ever pulled something out of your freezer to discover it dry, rubbery, and tasteless you have fallen prey to freezer burn. Here are 13 of the best ways you can prevent freezer burn from happening to your food.
When it comes to long term food storage, freezing is one of the easiest ways to preserve food. Your freezer can extend the life of foods from 2 to 12 months. This is a great way to take advantage of sales, or a thriving home garden to save money when feeding your family. Sadly if you are not careful you can lose food you worked so hard for to freezer burn.
When you add your food or prepared freezer meals to the freezer, always make sure they are at room temperature or cooler.
If your food is warm, place it in the refrigerator first to cool off completely before you stick it in the freezer. This will speed up how quickly your food freezes and help to prevent evaporation and ice crystals from forming. The faster your food freezes the less likely you will see freezer burn issues.
2. GETTING THE AIR OUT
Completely remove air from your packaging. Air is the worst enemy of your frozen foods. Air tight packaging leaves no room for evaporation that leaves your foods dehydrated and freezer burnt.
Here are some ideas on packaging your food to protect it from exposed air.
For soups or individual sized containers of food, put in a freezer safe container, leaving a 1/2 inch head space on top for soups (since liquids will expand). Place a piece of plastic wrap over the surface of the soup or meal, pressing down gently to remove air, and then add the lid.
For freezer meals in large baking dishes or casserole containers, wrap first with a piece of plastic wrap (or freezer paper, parchment or wax paper) over the surface of the food, pressing down gently to remove air, and then cover with aluminum foil or a 2-gallon freezer safe bag.
Use thick freezer-safe bags or vacuum-sealed bags to store food. With freezer bags, remove as much air as possible, such as pushing out the air before you seal the bag or using a straw to suck out the air before sealing. For extra protection (i.e. if you’re planning to freeze something for an extended period of time), you can double layer the freezer bags or even wrap the bag in aluminum foil. But for longer storage vacuum sealers are the absolute best at keeping air out.
For loaves of sliced bread, freeze in sections of 5-6 slices. Simply wrap the group of 5-6 slices in plastic wrap, freezer paper or foil, then place in a freezer-safe gallon sized bag.
For containers of Ice Cream – place a piece of plastic wrap over the unused portion of the ice cream, pressing down to remove air pockets, then cover with the lid.
3. ADJUST THE TEMPERATURE ON YOUR FREEZER
You want to keep your freezer cold to help prevent freezer burn.
For the best results set your freezer below 0ºF ( -17.8ºC). If your freezer is fluctuating above 0ºF freezer burn is a bigger possibility. To ensure your freezer is at the right temperature you can use a freezer thermometer (I recommend this one on Amazon) to track the temperature so you can properly adjust the settings.
4. REPACKAGE STORE-BOUGHT FOOD
Most foods sold fresh in the supermarket are not packaged for freezer storage. The packaging used in meat departments is thin and allows air to get in along with containing large air pockets where the moisture in your food can evaporate and form ice crystals.
Sliced loaves of bread also need repackaging if storing in the freezer as the bags are thin and allows air to get to the bread, drying it out.
Remove the items from their store-packaging and add them to freezer-safe bags or containers, removing as much air as possible.
5. AVOID OPENING FREEZER DOOR FREQUENTLY
Try not to open the freezer door often. If you have a spare freezer to store food for longer periods of time install a lock on the freezer to prevent people from going in it just to take a peek at what is inside out of boredom. Opt for a peel and stick lock as drilling can damage your freezer.
Also, don’t leave the door to the freezer open for a long time as this will cause the temperature in the freezer to rise, making it likely to rise above freezing. If you have family members that had a tendency to leave the door cracked consider adding a wirelessfreezer thermometer (I recommend this one on Amazon) to track the temperature and it will alert you if it’s left open on accident.
6. DON’T FREEZE TOO MUCH AT ONCE
Freeze food in smaller batches to avoid fluctuating the temperature of your freezer. Unfrozen food is warmer and will warm up the entire freezer. Stick with only 2 to 3 pounds of non-frozen food for each cubic feet of space at one time. Plus it’s most ideal to have your food frozen within 2 hours.
7. USE UP FROZEN FOOD SOONER
Frozen foods can be stored for a certain time for each item. How long food can be frozen varies by each item. The longer food stays in the freezer the more likely it is to become freezer burnt. To avoid this plan your meals to be used as quickly as you can.
8. KEEP YOUR FREEZER FULL
A freezer kept at least 75% full keeps your freezer at the right temperature and helps keep your freezer running efficiently overall. This not only will protect your food from freezer burn it will also lower the amount of power needed to run your freezer saving you money on your power bill. If you have a lot of open space in your freezer fill them in with bottles or gallons of water.
9. FREEZE FOOD QUICKLY
Try to freeze your food within 2 hours for ideal freezer burn prevention.
When your food takes a long time to freeze it is more likely to allow moisture to escape your food and form ice crystals. This means you want your food nice and cool before it goes into the freezer and keep your freezer very cold.
If you have a deep freezer use it to initially freeze food before moving it to your main freezer. Another helpful tool is the freezer cube (buy on Amazon) for freezing food quickly.
10. USE A VACUUM SEALER TO PREVENT FREEZER BURN
While there are several great ways to store your frozen food the absolute best option is a vacuum sealer with quality vacuum sealer bags.
The vacuum sealer machine bags are made specifically to keep air from coming in and out of the bags. This makes it so moisture cannot leave the food or evaporate out, thus preventing freezer burn.
Note: Regular store-bought plastic freezer bags are made from polyethylene, which moisture and other gases can get through. That being said, I still freeze my meals often in freezer-safe bags, getting as much air as is possible out and have gotten little if any freezer burn this way.
11. ALLOW FOR CIRCULATION IN FREEZER
Allowing air to flow through your freezer can help your freezer keep everything frozen solid. While you want to keep your freezer full you can leave small gaps to help air flow. To do this try organizing your freezer with baskets that will split things up just a bit and help create a little airflow.
12. FLASH FREEZE & TRANSFER
To keep items with frozen fruit and vegetables split up when bagged frozen you can use the flash freezing method to freeze everything individually.
To do this you place your items to be frozen spaced out in a single layer on parchment lined baking sheets. Once items are frozen solid move them to your freezer bags or containers as quickly as possible and remove as much air as possible.
13. BE GENTLE WHEN MOVING FROZEN FOOD AROUND IN YOUR FREEZER
It’s easy to get holes or dings in your plastic bagged or vacuum bagged meals once frozen so you need to be gentle when moving items around.
This ground beef was vacuum sealed, however due to dings and holes on the package air was able to get in and create freezer burn.
WHAT IS THE BEST METHOD TO PREVENT FREEZER BURN ON MEAT?
Remove the meat from the original store packaging. Place into freezer-safe bag, removing as much air as possible or use a vacuum sealer. For added protection you could also wrap the meat first in freezer paper, aluminum foil or saran wrap, then place in a freezer bag, removing air.
To prevent freezer burn on meat you want to repackage the meat and freeze it as soon as possible. If you do not plan on using your meat within a few days of bringing it home from the store repackage and freeze it.
WHAT IS THE BEST WAYS TO PREVENT FREEZER BURN ON VEGETABLES?
Vegetables can be a bit tricky. Some vegetables freeze much better when blanched so you will want to blanch those ones first. Remember to get as much air out of the bag as possible when freezing vegetables.
For storing vegetables you may want to use the flash freezing method (tip #12 above) to prevent you from having a thick block to thaw and cook. After flash freezing quickly move your vegetables to a freezer bag or vacuum seal them.
WHAT ARE BEST WAYS TO PREVENT FREEZER BURN ON ICE CREAM?
Have leftover ice cream you want to protect from getting freezer burn? To protect your ice cream take a layer of plastic wrap and press it down on top of the unused ice cream before returning the lid and placing your ice cream back into the freezer.
Another tip is that when you take out your ice cream be careful to not allow it to thaw too much or the sides of the ice cream that thawed will be more likely to get freezer burn.
WHAT ARE BEST WAYS TO PREVENT FREEZER BURN ON BREAD?
With specialty breads on the market, more and more people are turning to using their freezer to make quality bread last longer.
To freeze bread and prevent freezer burn take small sections (such as 5-6 slices) and wrap with freezer paper, foil or plastic wrap before placing your bread into a freezer-safe bag. Remove as much air as possible without crushing your bread before freezing.
Freezing food can be a great way to save money and make your food budget stretch.
With following these tips you can ensure you’ve taken the steps to prevent freezer burn and know your freezer meals are preserved at their highest quality. Knowing how to prevent freezer burn you can now go and fill your freezer with confidence!
Gathering up all the most adorable & perfect DIY Valentines for kids in this post has made me really nostalgic. All these ideas are so fun, so easy and any kid would love to bring these fun Valentines to give at the school party.
The best part? These Valentine’s Day ideas I’ve shared all have free printable tags so all you have to do is buy a little toy or treat, print out the tags and you are good to go. So easy!!! And thrifty too.
25+ DIY VALENTINES FOR KIDS
1.You Make My Heart Glow Valentine. Glow stick Valentines! How clever and thrifty too. Use her black-n-white free printable and add a glow stick. (via Delia Creates)
2. Peel the Love Cuties Mandarin Oranges Valentine. Not only is this a cute & clever Valentine idea, it is a healthy one as well! (via Happy Money Saver)
3. You Blow Me Away Valentine. Every kid loves bubbles and this is an adorable & easy Valentine idea! Find some inexpensive bubbles (usually at Target or the dollar tree at this time of year) and print out the free tags. (via Lacey Placey)
4.So Glad We’re In the Same School Valentine. A fast and inexpensive homemade Valentine using Swedish Fish candy and a free printable tag. (via I Heart Naptime)
5. You Light Up My World Finger Light Valentine. These finger lights are all the rage! Just attach them to the free printable valentine and you’re good to go. (via Design Mom)
6. Narwal Valentine. The free printable and cute spiral suckers make for the cutest homemade valentine ever! I’d even want to get this Valentine! (via The Cards We Drew)
7. Hey Valentine, I Think You’re A Star (Starburst Candy Valentine). This homemade valentine you’ll have fun getting your kids to paint on the stars! (via It’s Always Autumn)
8. Squishy Valentines. Oh how funny and fun these squishy valentines are. Stick them on the free printables and you’re done! (via Paper Heart Family)
9. Tiny Animal Valentines. Using little dinosaur toys! How awesome are those! (via Sweet C’s Designs)
10. Superhero Lollipops Valentines. Super heros are a fun idea for Valentine Treats and this Tootsie Roll Blow Pop Sucker is so adorable! (via Zakka Life)
11. Blow Me a Kiss Valentine Valentine’s Day is all about love and being sweet! This is a perfect little idea to use for classrooms or with friends! (via The Frugal Girls)
12. It Takes a BIG Heart to Help Shape Little Minds Valentine. Be sure that you do not forget the teachers on Valentine’s day! This is a small way to say thank you for all of the hard work that they do! (via Happy Money Saver)
13.Friendship Bracelet Valentine. This is a very cute and thoughtful Valentine Idea if you need a non-candy idea! (via Dandee-Designs)
14. Hope You Have a Ball Valentine. Bouncy balls are always a ton of fun and this would be a great frugal Valentine’s Day classroom swap idea! (via Happy Money Saver)
15. Lucky Charms Cereal Valentine. This is absolutely adorable! This is made with mini boxes of Lucky Charms cereal and would be great for kids and adults! (via Lily Jane)
16. Don’t Go Changin’ Valentines using Chocolate Coins. This is a very clever idea and everyone loves chocolate! (via Jacolyn Murphy)
17. I Chews You Bubblegum Machine Valentine. This valentine is a favorite for kids of all ages. (via Savings Lifestyle)
18. I “Wheelie” Like You Valentine. Uses dollar store cars! If you have little boys that want something a little special on Valentine’s Day, this would be a super cute and fun way to do that! (via Creating Really Awesome Fun Things)
19. Ring Pop Valentines. Kids go nuts for Ring Pops, at least mine are always asking for them at the store checkout zones! This Valentine one they will sure to love. (via The Gracious Wife)
20. Riesens Why I Think You’re Sweet Valentine. Riesens are a delicious candy and this is a very sweet way to tell someone all of the different “Riesens” that you love them! (via Happy Money Saver)
22. You Rock, Valentine! Pop Rocks are such a fun candy and this is a fantastic and frugal way to make a great Valentine! (via A Small Snippet)
23. Will You O”Fish”ally Be My Valentine? Goldfish crackers are a kid favorite and this is such a cute idea for Valentine’s Day! (via Pink Peppermint Design)
24. Tic Tac Toe Valentine. Get some packages of Tic Tac’s, print off a Tic Tac Toe free printable and you’ll have an adorable homemade Valentine to give out. (via Atkinson Adventures / free printable game idea at Autumn and Ash)
25. Lego Valentines. Got some extra legos hanging around? Lego Valentines would be so cool!! (via The Resourceful Mama)
26. My Heart Pops for You Popcorn Valentines. Fill up a plastic bag with popcorn, add some washi tape and print-and-stick the label to the bag and you’ve got the perfect DIY Valentines for kids! (via Birds Party)
If you’re looking for a cheap kid’s Halloween costume, check out this list of 20 Kid’s Halloween Costumes for Under $10! There’s something here for even the pickiest of kids!
Halloween is just around the corner, and that means it’s time to go on the hunt for a cute costume for your kids. There are a ton of choices out there, but many of them can be so expensive! Here are 20 of the best Halloween costumes on Amazon all for under $10, from Halloween classics to characters your kids love!
20 Cheap Kids Halloween Costumes for Under $10
**Remember that prices can change at any time so if you find the right costume, get it quickly while it is on sale!**
1. Kid’s Pumpkin Costume: (Buy onAmazon) Your kid is going to look as cute as a pumpkin wearing this costume (pun most certainly intended).
2. Superhero Outfits for Kids: (Buy on Amazon) If your child has a superhero inside of them like Spiderman/SpiderGirl, the Hulk, Iron-Man or more, this is the perfect costume for them!
3. Astronaut Costume for Kids: (Buy on Amazon) One step for man, and a giant win for mom! Your kid is going to love this classic astronaut costume!
4. Garden Gnome Costume for Kids – (Buy on Amazon) How cute is this gnome costume – perfect for every house complete with pointy hat!
5. Kid’s Witch or Wizard Costume – (Buy on Amazon) Harry Potter has nothing on these toddler sized-capes and hat – adorable and perfect for the kid who doesn’t who what they want to be for Halloween!
6. Kid’s Skeleton Costume: (Buy on Amazon) Looking for something a little more spooky? This classic skeleton costume is just too perfect!
7. Toddler Kid’s Ghost Cloak Poncho: (Buy on Amazon) This friendly ghost costume is perfect for those chilly Halloween nights with its soft blanket fabric!
8. Child’s Granny Costume: (Buy on Amazon) Dress up like your favorite elder with this curly silver-grey wig, glasses and necklace! One of the most perfect cheap kids Halloween costumes of the year!
9. Disney’s Buzz Lightyear Baby Costume – (Buy on Amazon) To infinity and beyond, this body suit is perfect for the baby sized 12 months, 18 months, and 24 months!
10. Kid’s Emoji Costume: (Buy on Amazon) Are you ready to have a ton of fun with this fun laugh-until-you-cry emoji costume? Perfect for boys or girls!
11. Child’s Jailbreak Costume: (Buy on Amazon) This prisoner costume has it all! It includes the shirt, pants, hat and even tattoo sleeves!
12. Marvel Rocket Raccoon Deluxe Boy’s Costume: (Buy on Amazon) What’s a cool kid’s costume roundup without a Marvel character? Dress your kid up as the sassiest character in the MCU!
13. Girls’ Disney’s Minnie Mouse Costume: (Buy on Amazon) A nod to the most famous mouse with the iconic dress, ears and bow – perfect for every toddler girl!
14. Toddler Girl’s Angel Costume – (Buy on Amazon) You will look so angelic with these wings and halo to make the cutest costume for your little one!
15. Vampire Bat Costume for Girls – (Buy on Amazon) This costume is perfect to turn heads this Halloween including flowy black wings, a choker and headband.
16. Girl’s Rainbow Unicorn Costume – (Buy onAmazon) With this unicorn costume on, it will be hard to not stand out complete with a rainbow dress with attached wings, tail, and horn headband.
17. Girl’s Witch Dress Costume: (Buy on Amazon) What’s a Halloween list without a witch in it? This costume includes the witch’s cape and hat!
18. Dalmatian Costume Set for Toddler Girls: (Buy on Amazon) This puppy costume is a show-stopper with the most darling tutu, headband, bowtie and tail!
19. Pirate Girl Costume: (Buy on Amazon) Girls can be pirates too especially in this cute soft outfit complete with the cutest hat!
20. Girl’s Mermaid Princess Costume Dress: (Buy onAmazon) If your kid is obsessed with mermaids, they’re definitely going to love this mermaid dress!
So no matter what your kid’s interest may be, they’re sure to find a costume they absolutely love in this list of 20 Cheap Kids Halloween Costumes for Under $10! Let me know in the comments what your favorite costume option is!
Want More Halloween Ideas?
Halloween Treasure Hunt– Surprise your kids with this super fun treasure hunt to start the season off right!
Check out my AWESOME list of 20 of the BEST simple trunk or treat ideas for your car, truck or SUV! You’re going to love these easy and super fun Halloween ideas to make your trunk the best in the lot!
Every year my church does a Trunk or Treat for Halloween. I am always looking for simple trunk or treat decorating ideas and something that can be put together quickly.
If you haven’t heard about a Trunk or Treat before it’s usually a church, school, neighborhood or community sponsored event where people gather up and park their cars in a big parking lot. They open up their trunks or truck-beds and decorate them. Then they pass out candy.
It’s a fun way for kids to get a lot of candy in a short amount of time. Plus, it’s a nice, safe family-friendly environment, too.
Here are my favorite Simple Trunk or Treat Ideas!
1. Skeleton Theme
Set up a spooky Skeleton Truck or Treat Idea from Curly Crafty Mom complete with pumpkins and lights! A perfect setting to a fun Halloween night and an easy trunk or treat idea for SUV’s!
2. Candy Land Theme
Bring Candy Land from Pinterest to life in your trunk! This works great in a truck because you can fill the whole thing with candy – every kid’s dream! No kid will be able to resist walking up those colored spots!
3. Zoo Theme
It’s a true Trunk Zoo from Project Little Mo in this trunk. Perfect for SUV’s and that can use all your animal stuffed animals for a quick and thrifty trunk!
4. Unicorn Theme
This larger-than-life Unicorn from Pinterest is the perfect way to magically decorate your car for Trunk or Treat! I mean, who can resist those eyelashes and all of those colors – not me!
5. Camping Theme
Going camping has never been more fun than in this Camping Trip from Jeannie Marie & Company. Set up a tent, a chair and a cute paper fire with plenty of treats – sounds like my kind of camping! Who knew that trunk or treat camping ideas could be so fun?
6. Mouth Theme
Have you ever seen a bigger Mouthful of Candy from Pinterest? Such a fun way to display treats in a car or an SUV especially if you want to walk around with your family!
7. Wizard of Oz Theme
Follow the Yellow Brick Road from Pinterest all the way to the bucket of treats at the end of the rainbow! This would be a fun trunk or treat idea for church or a neighborhood gathering!
8. Frog Theme
Transform your car into one big Trunk Frog from Pinterest. Complete with the longest red tongue that is perfect for leading kids to the treats in the trunk.
9. I Spy Theme
Make the ultimate trunk with this interactive I Spy game from Pinterest. Use items from all over your house and add them in your trunk. Kids will be hanging around your trunk all night playing this game! What fun ideas for pickup trucks on Halloween!
10. Mummy Theme
What can you make with an old sheet and a little paint? A Mummy from Pinterest is the perfect idea for trunk or treaters! Such a simple trunk or treat idea that everyone will love!
11. Grease Theme
Bring all the nostalgia from the movie Grease from a User on Flickr to your trunk with simple decorations. This would be a fun trunk or treat idea for church, too. Bonus points if you wear a poodle skirt! Go, Grease Lightening!
12. Black Cat Theme
Transform your car into the biggest Black Cat from a User on Flickr the kids have ever seen! It will prove to be a purr-fect night with the treats in the trunk! It’s a simple trunk or treat idea that will knock the socks off the guests!
13. Pirate Theme
Ahoy, Matey! Pirate Treasure from Pinterest is found in your trunk and this is the one the kids will be clamoring to come to on Halloween night! Lay our your gold treasures – aka candy – for the perfect decoration/treat ever!
14. Spooky Halloween Theme
A Classic Halloween trunk is the perfect way to come to a trunk or treat. With spiderwebs, gravestones and cauldrons, what more do you need for a spooky good time?
15. Teenage Mutant Ninja Turtle Theme
Bring back the Teenage Mutant Ninja Turtles in the best way possible with this simple TMNT decor from Pinterest! This is an easy trunk or treat idea for SUV’s. The only way it could be better is if the theme song is playing. Turtle Power!
16. Jurassic Park Theme
Welcome all of the Jurassic Park fans to a fun world of dinosaurs in the back of your jeep from this cool idea from Pinterest! Complete with an inflatable dinosaur, this trunk will be a hard one to beat! It would also be a great idea for a truck bed!
17. Kayak Theme
Kayaks and candy – what a great combination from the Daily Sentinel! This is one of those ideas for a pickup truck that will wow the other guests! Easy to set up and so fun to be at as all the trick-or-treaters come by to get their candy!
18. Alice in Wonderland Theme
No trunk or treat is complete with an Alice in Wonderland-themed idea for a pickup trunk from Down South Balloons on Instagram! With simple decorations this is a fun idea for your truck bed and to show off all that memorabilia!
19. Aladdin Theme
It’s a whole new world when you have an Aladdin-themed trunk from the Dating Divas that could be great for pickup trucks or for cars. I wonder if you can get a Genie to come out of that lamp though….
20. Monster’s Inc Theme
Imagine seeing this fun Monster’s Inc trunk while you were our trick-or-treating! I would love to see Mike Wazowski from Shine Like Stars come alive in this trunk especially if he was handing out the treats!
Monster Cookies – The spookiest cookies that taste amazing and are a great family project!
Pumpkin Bowling – A fun family game that everyone can play using Halloween materials!
Halloween Treasure Hunt – Put together this adventure that will take Halloween to the next level with this super fun treasure hunt.
DIY Pumpkin Spice Room Spray – Fill your home with the fresh aroma of fall with this homemade pumpkin spice room spray.
For more Thrifty Trunk or Treat Ideas check out my Pinterest board full of them! And please tag me on Instagram showing me your trunk – who knows, it may end up on my list next year!!
This blog post was originally posted September 18, 2014, and updated with several new ideas, better images and updated descriptions on October 15, 2020.


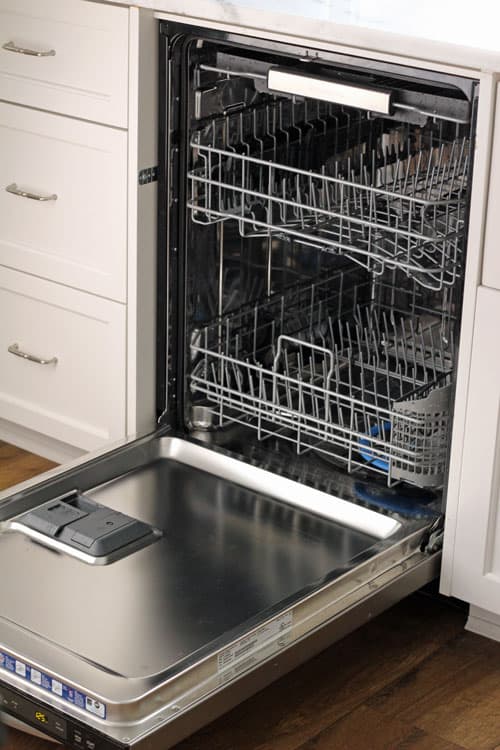


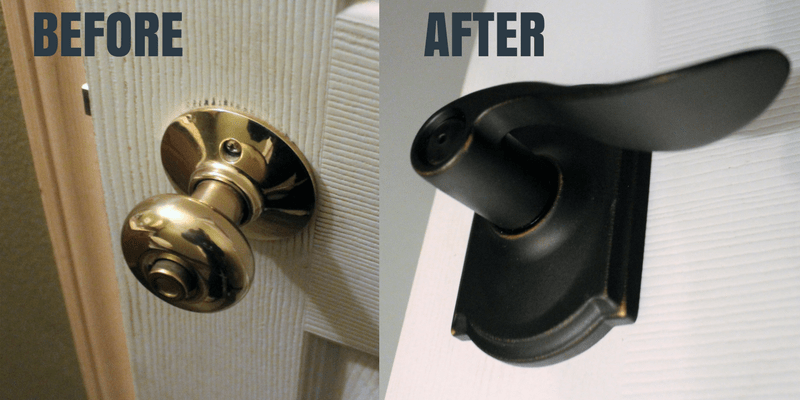

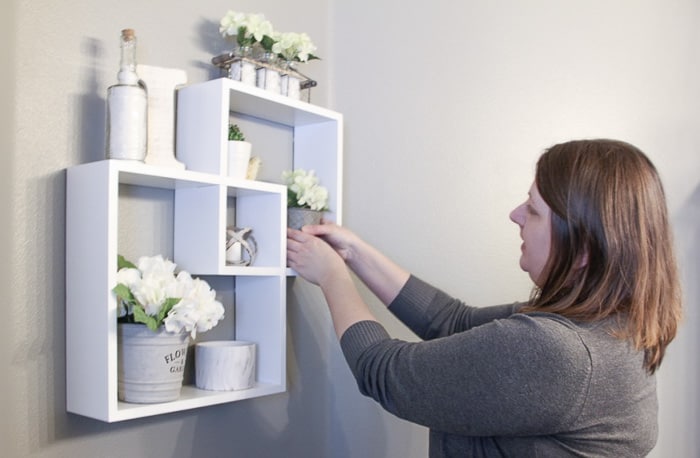


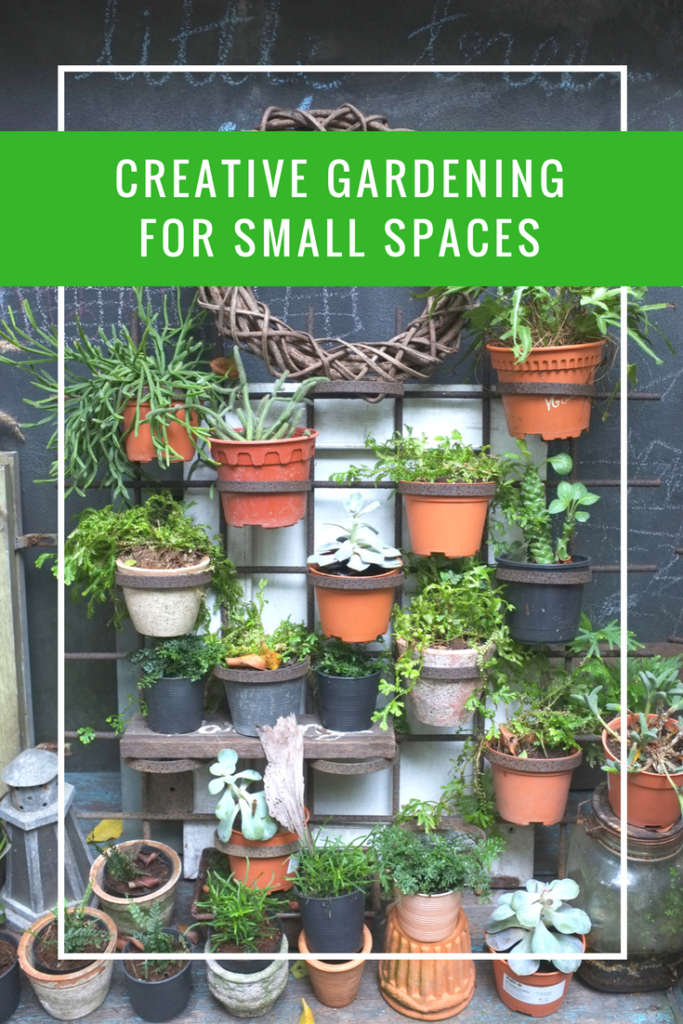

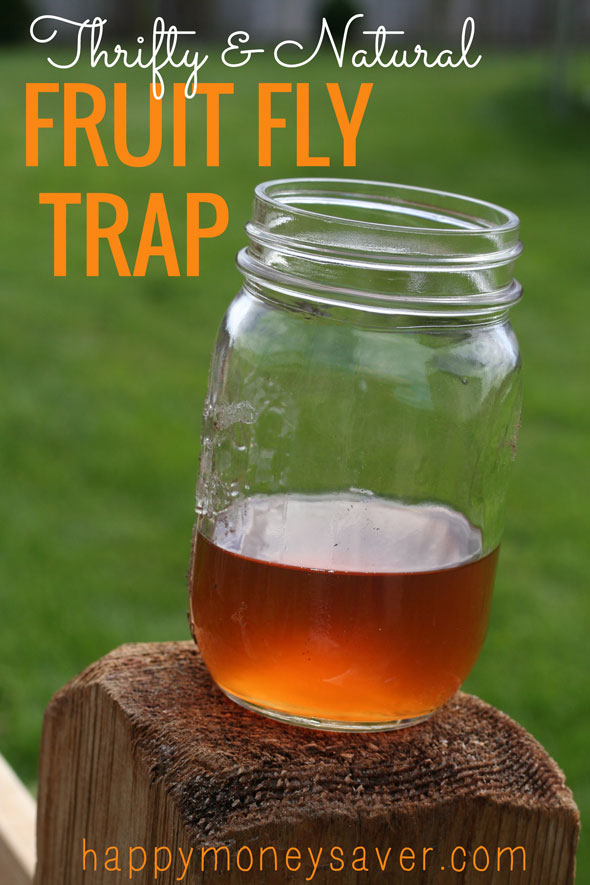
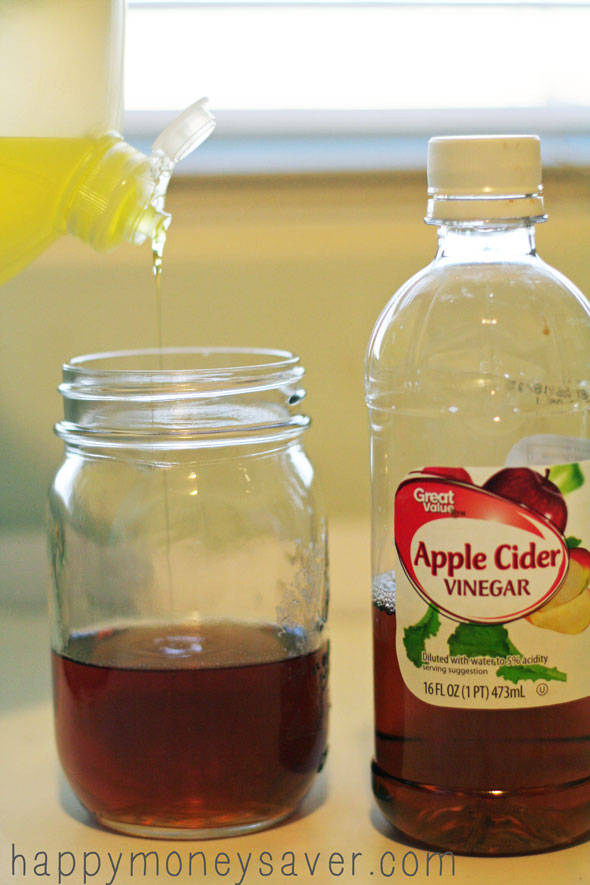

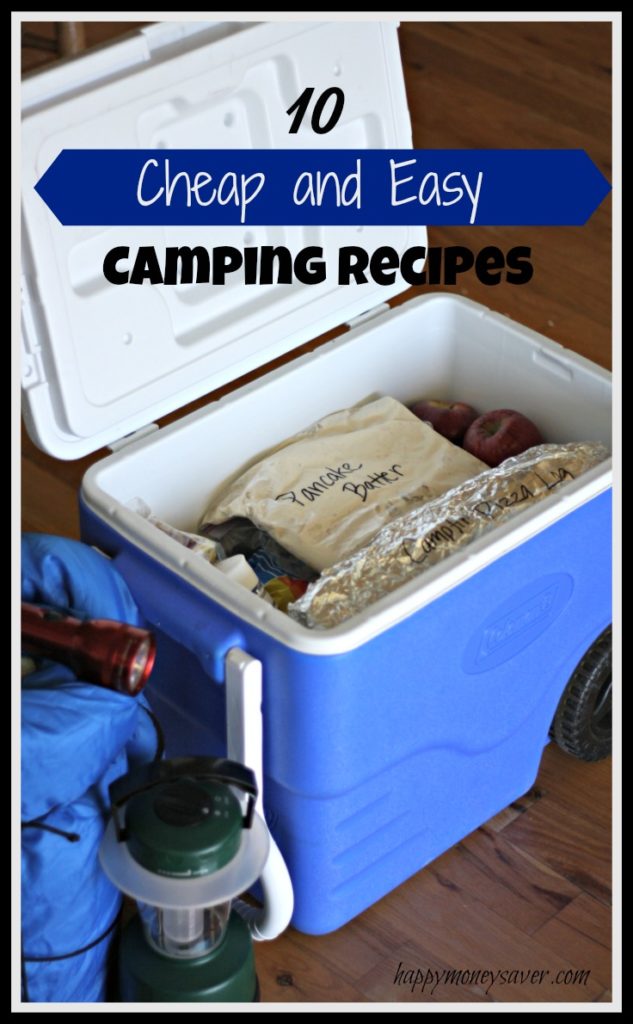


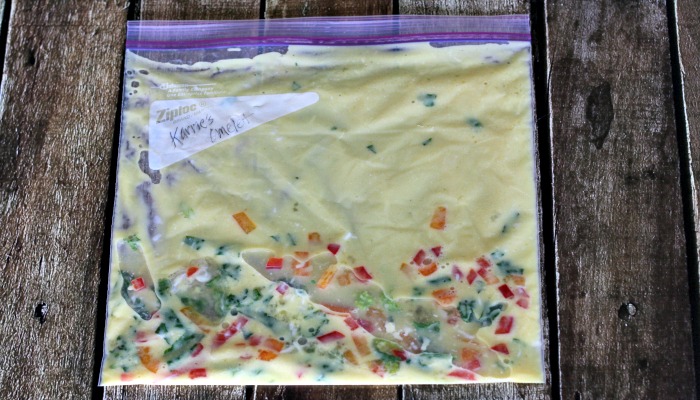


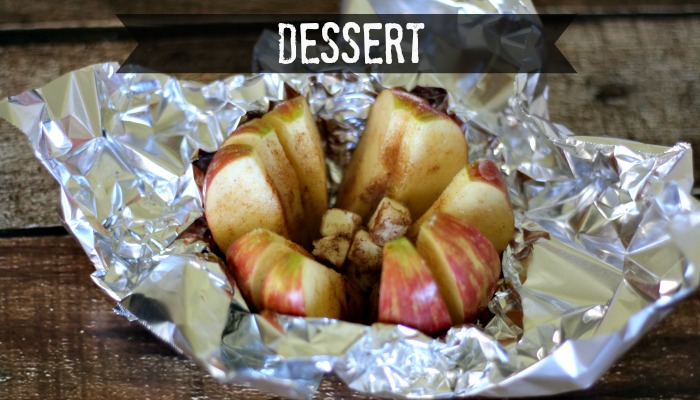

 10 – Cake in an orange – This cake is cooked in an orange! Cut the top of the orange off and scoop out the flesh. Take your time with this part because you want to be able to put the orange back together again without the orange flesh. Fill the orange with prepared cake mix or your own homemade cake batter leaving room for it to rise. I fill it a little over halfway full and it has worked every time. Put the top of the orange back on and wrap it in foil. Tuck it around the hot coals for about 20 minutes turning about every 5 minutes. Even though it smells delicious let it cool for about 5 minutes and dig in!