Quantcast
Channel: Happy Money Saver
Viewing all 142 articles
Browse latest View live

Reuse Old Sweaters to Make Homemade Boot Socks

$
0
0

September is the beginning of boot season for most people. You know the months when you pick your entire outfit based around which boots you want to wear. Tell me I am not the only one.

When looking for a new way to enhance some of my classic boots for the long winter months, I found adorable boot socks…with outrageous prices. On closer examination of the socks I found that they looked like a couple sweaters I was ready to give away. And thus the homemade boot socks were born!

Reuse old sweaters to make boot socks.  It is so easy and takes less than 10 minutes!

How to make Homemade Boot Socks from an Old Sweater.

Materials:
Old Sweater, Sewing Machine, Pins, Fabric Scissors

1. Make sure your sweater is clean and dry. Lay it out flat.

Use old sweaters to make boot socks!  So easy!

2. Cut the arms of both sweaters off and slip them onto your legs to get the fit right. Pin them into place where you want to sew them.

So easy to make boot socks out of old sweaters

 (Aren’t my daughter’s feet so cute??)

3. Hem the raw edges with a sewing machine. If you don’t have a sewing machine or just want to get the project done quickly use fabric glue or hand stitch it.

Hem an old sweater to make boot socks

4. Throw on your favorite skinny jeans, slip your new homemade boot socks on and you are ready for a night out.  That’s an order!

Boot socks are so easy to make out of old sweaters!

Homemade boot socks make great thrifty presents for friends, too. They can get up to $30 a pair so free sounds pretty good! Dig through your closets, make yourself a pair or two and get ready for the start of  boot season!

The post Reuse Old Sweaters to Make Homemade Boot Socks appeared first on Happy Money Saver.


From Money Woes to Money Woo Hoos

$
0
0

Since my site is happymoneysaver.com I thought maybe it was time to discuss one of the most taboo topics in our society….dun, dun, dun….money!

More specifically I would like to share with you some of the ups and downs that I have experienced while dealing with the family budget. I can’t be the only one who has ever been kept awake at night wondering how the bills are going to get paid, or wondering if that check I sent to the electric company is going to go through, can I?

Early in my marriage my husband and I did not talk about money much. He tried to be the one to pay the bills, but because of his busy schedule with work, he often times fell short. He would forget to send in checks, or forget to tell me what my grocery budget was. We were bouncing checks monthly, and the result of that was disastrous. ( It is a well known fact that accounts cant balance their own check books. Haha.)I don’t know about you, but my bank charges 28$ per bounced check, and we mustn’t forget the often times 50$ charge from the company that you sent the bad check to. If this has ever been you, take a deep breath, and know that you are not a bad person. People make mistakes. Eventually, my husband came to me and told me he just couldn’t do it anymore. So, with my knees a-knockin’ I agreed to take over the finances.

I have to admit, for the first few years, I wasn’t any better at it than him. I would forget about checks I had sent out, and see a cute scarf at the store. When I looked at the balance book I thought “Yes, I have enough money to splurge!” To my dismay, that was rarely the case. So, for a while we continued dealing with NSF fees, and of course arguments about how we were going to make ends meet.

Eventually, I was fortunate enough to be introduced to the money envelope budgeting system. By now I am sure you have heard of it; You cash your paycheck and divide it up into envelopes (car insurance, gas money, electric bill, fun money, etc.) Every penny is delegated out according to priority and importance. For a long time, there was no fun money, and we had many boring weekends and holidays. Also, I must admit that it wasn’t a program that I held onto forever. Though this system taught me how to prioritize, more importantly, it taught me self control, and gave me new ideas for how to better control my budget.

I now keep a log of all my bills and each payday I make sure they get paid. Check bouncing isn’t an issue anymore. One, because most of my bills are paid online with my debit card. Thank you to the electronic/computer era! Two, because each day before I leave the house I update my budget in a record book so that I know exactly how much money I have to spend on that gorgeous new pair of shoes that I have been eyeballing all season.

There are so many options when it comes to the “How to’s” of budgeting and staying out of debt. Find what works for your family, and don’t be afraid to discuss new ideas with your partner, and even your friends. If you don’t know where to start the conversation considering giving onUp.com a try. They have this neat quiz that helps you understand where you fit, financially, in society, and it gives you ideas and solutions to improve in the areas where you are struggling. With #onUup you can get onUpdates that will also help you reach your financial goals, and navigate you to a more successful future. At the very least you can get peace of mind. I know I did when I found out that 44% of the American population has admitted to having the same money troubles and triumphs that I have had.

With #onUp I have even more tools to help my family succeed, and maybe,eventually, I will even have enough money in my savings to take that family vacation to Disney World!

At SunTrust Bank their purpose is lighting the way to financial well-being. When you feel confident about your money, you can save for your goals and spend knowingly on what matters most to you.  

The onUp movement was created to guide millions of people one step at a time towards a more financially confident life without ever losing sight of the moments that matter along the way.

Why is SunTrust sparking a movement?
Over 70% of Americans are financially stressed
12% of Americans skip going to the doctor because of financial concerns
80% of people admitted that their personal finances keep them awake at night
21% of couples who rate their financial stress as at least “somewhat high” are arguing more
32% of adults say their finances keep them from living a healthy lifestyle

Join the growing number of people transforming their stress into positive motivation to move onUp.

Join the movement


This is a sponsored conversation written by me on behalf of SunTrust. The opinions and text are all mine.

The post From Money Woes to Money Woo Hoos appeared first on Happy Money Saver.

Tips on Buying Land (Build a Home on a Budget Series)

$
0
0

Best Tips on Buying Land! This is the first post in a series of Building a Home on a Budget Series. Great tips for anyone looking for land!

This post Tips on Buying Land is the first post in a series on building a home on a budget. Stay tuned for more in this series as I share all I have learned about staying within my budget while building the house of my dreams.

I’m gonna start this out by letting you know that I looked for 2 years almost every single day for the perfect piece of land to build my new house on. Now I know that not everyone out there has the patience to wait like I did and honestly I didn’t think it would take that long to find the right land to build on in my budget.  But it did.  And this was out of necessity really as land in my area can be rather expensive. Plus I am picky and on a tight budget.

Best Tips on Buying Land! This is the first post in a series of Building a Home on a Budget Series. Great tips for anyone looking for land!

Here is how my land is looking right now. Yep, it’s basically 5 acres of weeds that are slowly drying out. We have moved into our home, however we really haven’t done anything to develop the land as of yet. We need to start with irrigation, and then we can do some landscaping, gardening, fencing, grass, pastures, chicken coops, outbuildings, barn …oh my!  It’s a little overwhelming.  We we are in the process of getting an irrigation design figured out and then we can get to work digging trenches. Thank goodness my husband can do a lot of the irrigation himself as that is gonna save us a ton of money. But for now, the land is just full of weeds. Weeds and dreams.

Tips on Buying Land

Okay, so let’s talk about how to find the right land to build on when you’re on a budget.

First things first, time to make a list…

The first thing you need to do is decide how much you can afford. Your budget is a big decision! Be realistic about how much you can afford.  Many people purchase land and then slowly pay it off before building a house on it. Or live in a small trailer on their land while they pay it off. Others save up and pay cash outright for their land.  Did you know that land loans and construction loans can be rolled into one if you’re prepared to begin building right away? Yes they can!  That was what my husband and I chose to do and we are really happy with how it all worked out in our budget.  So whichever route you are planning figure out how much you can afford and try hard to stick with it.

After you get your budget figured out decide on all the other factors. How much land? 1/4 acre, 1 acre or more? Decide on what you want the land for. Do you want to have animals? Do you want some pasture land? Do you just want a small backyard? A garden? A pool? Write down on paper your “dream” lot of land. Once you have your budget and your dream lot you can start researching to find your land.

Here was my “dream” land list and why:

1-2 Acres: I wanted a mini farm and this seemed the perfect amount for me to take care of. If you were looking to have a big farm you may want more acres than this. But for me, I knew how much work goes into a big lot and this is how much I wanted to handle personally.

Have no covenants (or limited covenants) so that I can have farm animals: Always check what kind of covenants the land has to make sure you are happy with it. I have never really been a huge fan of covenants that are super strict because I love my freedom to do whatever I want. However with having not many covenants you run the risk of having a neighbor with a metal collecting junk yard next door which can devalue your property in the future so keep that in mind. Even though I keep a clean house and most of the time well maintained yard I am not too judgy of others and how they run their lives. So no covenants works great for me, especially if the lot is far enough away from others. 

Water – must have full water rights so I can irrigate all my acres: Make sure you look to see if you have full watering rights to your property and what type of water you can have. This can be devastating to buy a lot of land and find out you cannot even drill a well to get water. If you have irrigation rights find out if your lot has full water rights. Over here where I live in the Tri-Cities, WA you will find many people that purchase a 2 acre lot find out they only have water rights to water ½ an acre of it. So you will see many homes with green right around their house and then it cuts off into brown un-watered desert for the remainder of their property. What good is the land when you cannot even water it? Always, always, always look into what kind of water rights.

Must be under $70,000 in price: my budget.  Do some research to see what prices are in your area for land and decide what the right price point is for you.

Would love old trees on the property: trees take so long to grow so it would be nice to have some old trees already there.

Flat land, not on a hill: Mowing on a hill is not too much fun and I like being able to see my land. Some people may like hills but having them can come with hidden challenges and sometimes can be more costly to develop if you have to make retaining walls.

In a good location with great schools for my kids: I want my kids to get a great education so I researched all the schools stats in my town. Then printed out a city map and highlighted the areas to choose from with better schools so I made sure when I saw a lot it was in an area I wanted before I went any further in the process.

Quality soil for growing: I plan on growing a garden and even some orchards so I wanted to make sure the soil was great. When I went to view the lots for sale I took a little soil sample and mixed it with water in a jar, then let it settle to check what kind of layers it had. See a tutorial here on mason jar soil sampling.

Have a lovely view of something:  I hoped for a nice view. Hey, a girl can dream, right? :)

That was pretty much my list. I didn’t end up actually getting everything on my list when I found my lot. My land lot didn’t have old trees and I ended up with 5 acres instead of 1-2 but overall I was really happy as everything else was on my list and the price was within my budget.

You want to keep your list handy or in the back of your mind when you are searching for your land. It’s okay to be picky because this will be the land you will stay in for a very long time, well at least you hope right?

Best Tips on Buying Land! This is the first post in a series of Building a Home on a Budget Series. Great tips for anyone looking for land!

How to Find Land

Like I mentioned before I looked almost daily for 2 years to find my perfect lot. Searching online, and going on Sunday afternoon drives. A lot of praying was happening too. So yeah, 2 years is a long time! But your perfect lot may be already waiting for you when you start looking. I hope that for you, I really do.

Some places to look for land:

Craigslist: This is where I ended up finding my land. Search for words like “land” or “lot” or “acres” and scroll through it all.  When people list land for sale they don’t always categorize them into the land for sale area so I found it better to search using keywords instead of always in the land for sale category. When my lot became available there were actually (4) 5-acre lots for sale in my budget.  It sounded too good to be true but I called anyways. Long story short … all (4) of those 5-acre lots were sold within a few days. When a great deal comes along you have to be ready to jump on it quickly!

Real Estate listings: Keep an eye out for new land listings in your budget. You may even call a real estate agent so they can know you are looking and contact you right away if something is in your budget and meets your dream land list. I found that with the real estate fees and the competition this way was really difficult for me to even have a chance to look at land because of people always beating me to making offers.

Driving around: Sometimes I would just drive around the areas on my list and look for land for sale by owner signs. I would snap a pic with my phone and contact them when I got home to ask about the prices. This can be a great way to find land lots too.

Other publications like Giant Nickel – sometimes you can find land listings here too.

Word of mouth: Tell all your contact and friends you are looking for land so that if they hear of anything before it goes out on the market to tell you.

Other Final Tips on Buying Land

Be pre-approved for a land loan: Have a land loan pre-approval letter ready (unless you are paying cash) so if the perfect lot in your budget comes up you can be ready. Great deals go super quick on land sometimes. In my area there was only one bank that does land loans – First Community Bank. So look into getting a pre-approval before searching for land if you can. If you have saved up cash, even better!

Drinking water: look into what kind of drinking water the lot has. Whether it’s city water or if you have to drill a well. You can search your county listing for well listings of properties near yours, how deep their wells were and the pressure they get. Then take that average and contact a well driller for an estimate. Water development can cost a pretty penny so add that into your budget.

Septic system or connecting to city sewer:  Something to look into before you buy. If you need a septic system get a quote on how much it will cost to put that in. Mine costed around $5000 for the whole system, which was an average price comparatively in my area for the system needed. If you need a specialized septic system costs can be a lot more.

Electricity: Check to see if you have a connection to electricity or not. If you are really far away from any power poles or boxes it could be an expensive addition.

Stick to your Budget: It’s really important to be smart and realize how much you can afford and not be swayed by higher priced lots. Be wise and stick to your budget.

I hope these tips on buying land to build on help you out!

Have you purchased land before? How did you find your lot? How big of a property did you buy and what are you doing with it? And most importantly, any tips for me on what I am supposed to do with acres of weeds? 😉

Awesome tips on buying land. Things you might never think of and expenses that you must consider before buying. Also many tips on how to find the perfect land for you in your budget.

The post Tips on Buying Land (Build a Home on a Budget Series) appeared first on Happy Money Saver.

Build a Home on a Budget: How to Save Money on Your House Design

$
0
0


house

This is the second post in my Build a Home on a Budget Series. We’re talking all about which house plan or layout to choose from that will be the most cost effective.  Every step of my house building process sent me into a crazy must-research, price comparison mode. I searched on Pinterest, Googled, and read articles after articles. I wanted to get the best quality home with lots of upgrades and still keep my budget. I really really HATE wasting money and wanted to do the whole process right.  I spent way too much time trying to get everything perfect (I can admit it!) and even though I went through countless days of feeding my kids cereal for dinner and building mounds of laundry up by neglecting my daily routines for research purposes, I feel like it was worth it. I adore my new home. It’s even better than I dreamed it would be and I was able to stay within my budget.

WHO WILL BUILD YOUR HOME?

If you have the ability, know-how or connections to be your own builder/contractor you will save the most money doing it that way. However, as a newbie building my first house there was no way I was going to be able to do that. Looking back now though, it seems I could have easily done it as all it takes is someone who’s really great at scheduling and (ahem) nagging.  As I mentioned in my dream house post here I looked into all the local home builders in my area to find the one with the best prices per sq. ft. and one that had great prices for upgrades as well.

There are all kinds of builders and building companies out there.

Spec Home Builders: these builders usually purchase a large lot of land, subdivide it and build many houses on the lot with their floor plans. Often times the builder saves money doing this and so they seem to have the best prices from what I’ve found. Some of them will do a custom house plan and some won’t. Some will build on your lot and some will not. Make sure and research all the different companies, visiting them, picking up their price sheets for home base prices as well as upgrades, viewing their homes and asking them if they will do a custom layout and what the price starts at. You must do your research. Even when you find a house plan you LOVE check into all the builders in your area. Because you never know if you can find a builder that can make nearly the same plan you just fell in love with for a lot less.

All other builders: the other builders out there will usually have great reputations as making quality homes and maybe that is important to you. But honestly whether you build with a spec home builder or a “more quality” builder you can oversee every step in the building process to make sure everything is done right if you want to. You can usually upgrade your windows or doors to get the best quality you desire. Plus the quality builders seemed in my area to charge 50% higher prices per sq. ft. than the spec home builders – Yikes! I found that building my house with a spec builder saved me money, and I still have a wonderful quality house.

So, my advice is to research, research, research. Find a builder that will give you the most for your money and one you can trust.

house2

PICKING YOUR HOME LAYOUT PLAN

A lot of the time when you go to spec home builders they have a whole bunch of house plans for you to choose from. Sometimes they allow you to tweak their plans a little bit by adding a closet, changing a door location, expanding a bedroom etc, so keep that in mind. If the plan is almost what you want you may be able to tweak the plan and make your dream house. But those changes can cost money so make sure and check on those prices.

If you don’t find any layouts that you like in your price range, you are most likely a custom home plan person like me!

I kind of liked one spec house plan, but it wasn’t exactly what I wanted. So I went online and searched house layouts. There are tons of different sites out there that let you search by house type, bedrooms, sq. feet and more. Yep, you got it…more research.

Seriously, the research never ends! 🙂

Tip #1: to save money on a house layout look for house plans without too many edges. The more exterior corners, the more expensive it can be to build.

I searched until I found a layout that was almost exactly what I wanted. My dream house was a combination between the spec house and the online house layout. I went and used a free online program called floorplanner.com and started making my own layout. Here is my house layout – as you can see there is not too many edges or pop out exterior rooms. This saves money as many times builders have to pay more for framing houses with many edges.

truman-layout-olin

Tip #2: Try to find a spec home builder that will do a custom built home for a great price.

I feel so fortunate to have found my builder (Olin Homes). My house plan was around 2700-2800 sq. feet and they gave me the same starting base price of one of their homes with the same sq. footage. I would have to pay a little more for my layout having additional windows or doors, but this was the best price around by far. So I got a custom house design for the spec house builder price. Basically the best of both worlds.   The best part was that the builder took my online designed layout and for a fee re-created an actual blueprint design for building with. Bada – bing- bada- boom.

Tip #3 The more square footage of the house, the more expensive it can be. Make a few rooms smaller & save big.

When making my custom house plan with the free online program as mentioned above I reduced room sizes whenever I could to save money. Even reducing a foot off of a room can save thousands of dollars. So I made my master bedroom smaller, and had a two story opening in the family room. I could have used that space above the family room for a bonus room, but by opening it up I saved money and made my home feel much more open and spacious. I kept my master bathroom and kitchen area big however because those are usually rooms that add value to a home. So figure out what rooms you can shrink and save yo’ self some money.

Well, that’s about all I can think of right now. Do any of you out there have any other awesome tips for saving money on your house plan design? If so please leave a comment below.

The post Build a Home on a Budget: How to Save Money on Your House Design appeared first on Happy Money Saver.

How to Clean Your Dishwasher in 4 Easy Steps

$
0
0

Sponsored by Frigidaire Gallery®.

How to Clean your Dshwasher

I don’t know about you, but to me it sounds like an oxymoron to clean your dishwasher. Isn’t it cleaned every time you use the dishwasher? I mean it is what the dishwasher does—wash dishes. But just like with your washer machine, soap scum can build up along with food particles and other yuck.

So what should you do to clean your dishwasher? Just follow these steps …

How to Clean your Dishwasher

1.  Take Out and Clean Dishwasher Parts

How to Clean the Filters in your Dishwasher - Easy Easy Easy!

Take out all parts of the dishwasher that can be removed by hand. Typically dishwashers have a filter in them to remove and clean. In my Frigidaire Gallery® Dishwasher I have a fine grade and coarse grade filter, and so I only need to check and clean it when necessary if large food particles become trapped or when I notice a drop in cleaning performance.  The filters on my dishwasher are self-cleaning, but when I want to do a deep clean or get out tough gunk I do clean those filters out.  Here is the gunk I found when I cleaned my filter out….I know…ewwwww!

Typically dishwashers have a filter in them to remove and clean. In my Frigidaire Gallery® Dishwasher I have a fine grade and coarse grade filter, and so I only need to check and clean it when necessary if large food particles become trapped or when I notice a drop in cleaning performance. The filters on my dishwasher are self-cleaning, but when I want to do a deep clean or get out tough gunk I do clean those filters out.

Take them out, and clean them with warm, soapy water. You may need a sponge to get all the gunk out of your filter.

How to clean your Dishwasher How to Clean your Dishwasher filters

2. Wipe out the inside of the Dishwasher with Soap & Water

How to clean your dishwasher stainless steel parts

Gunk—everything from food particles to bits of plastic—can get stuck in on the edges of the dishwasher door, or on the walls of the dishwasher. Take a dishcloth with warm soapy water and wipe it all down well.

3.  Clean and Sanitize Dishwasher with Vinegar

Make sure the dishwasher is completely empty of all dishes. Then take a dishwasher-safe cup, such as a glass measuring cup, and fill it with vinegar. Place the cup with the vinegar in the dishwasher on the bottom rack and run the dishwasher on the hottest cycle.  The vinegar will sanitize the dishwasher removing any odors that linger. If your dishwasher has a lot of hard water stains you may need to do this routine more than once.

4. Clean the Outside of the Dishwasher

How to clean the outside of your stainless steel dishwasher and clean the inside too easily!

Once the inside is clean, next you’ll want to clean the front of the dishwasher. Start by wiping down the top of the door that meets the top of the dishwasher. Then take warm soapy water and wipe down the front of the dishwasher. Then dry it all off with a soft towel.

How to Clean Your Dishwasher with these 3 easy steps!

When I clean my Frigidaire Gallery® Dishwasher regularly once every 2-3 months, I find that my dishes come out sparkly clean which saves me time. No more irritating little food particles to have to rewash! And I really love the soft rubbery prongs that keep my cups from banging all around while they are getting cleaned. It’s probably my favorite feature about my dishwasher.

Easy method for Cleaning your Dishwasher and getting rid of the film on dishes

Cleaning out your dishwasher not only helps with odors and ickiness, but it can also help your dishwasher keep your dishes coming out sparkly clean.

The post How to Clean Your Dishwasher in 4 Easy Steps appeared first on Happy Money Saver.

Make Ahead Cold Lunches {A Week’s Worth of Lunches in a day!}

$
0
0

Disclaimer: this post has been updated with new images and ideas with special thanks to my sponsor, Frigidaire Gallery®. I love this post and continue to make ahead my kids cold lunches to save time and money!

An amazing idea for dealing with kids lunches! Making a bunch of items in one day for the week so there is no stress during the week!

It’s morning. You’re tired, and moving slow. Your brain is trying its best to remember all the morning tasks and get the kids off to school on time. About 5 minutes before the kids head out the door you remember you need to make their cold lunch. And then it’s crunch time. You worry if they’ve even remembered to brush their teeth as you open the fridge to see what they will be having for cold lunch. With not enough time…it’s either going to have to be hot lunch again or another boring peanut butter sandwich.

Sound familiar?

This was pretty much my life for the better part of my kids growing up.  Always rushing, feeling like it was just too much hassle to do the whole “cold lunch” thing. Money was tight but so was time. I wanted my kids to have a healthy lunch but struggled with variety, time and preparation. I would usually do really well for the first few weeks of school and then get lazy. I found that if I didn’t prepare the night before, it was a mad rush in the morning where I found it easier to just say, “You’re getting hot lunch today!”

But now I have a method that really works. I have been making a week’s worth of cold lunches all in ONE day for a few years now, and it is the best thing for busy moms! This method has totally saved me.

ALL IN ONE DAY

Awesome kids lunch ideas for helping save time. Make all your lunches in one day for the week and have your kids grab their own lunch and pack it easily each morning before school. I have done this method for years and it works!!

So how this works is the following: Once a week I chop and bag up all the fresh fruit, vegetables, crackers and any other lunch items all at once.  Then I add them to 3 different cold or dry lunch buckets to store in my fridge, freezer and pantry. The kids can quickly grab the items to throw in their lunches themselves in the morning or evening before and my work is done. Takes all my stress away.


THE MAKE AHEAD LUNCH BINS

This is hands down the BEST method out there for making ahead your kids lunches for school!

Dry Goods Lunch Bin

The dry good lunch bin currently sits in my pantry. It’s simply a plastic tote bin.  It’s filled with individual bags of dry lunch items such as bagged pretzels, crackers, homemade granola bars, trail mix, treats and more. Here is a list of ideas and dry lunch items we have done in our lunches:

Store-bought or homemade crackers
Pretzels
Pre-packaged Fruit Cups or applesauce
Homemade Granola or Trail Mix
Homemade Granola Bars
Popcorn
Nuts (if your school doesn’t ban for allergies)
Beef Jerky
Chips
Graham Crackers
Homemade Cookies  or brownie bites (bake a big batch and individually bag them up)
Special Treats ( usually for a holiday)
Cold Refrigerator Lunch Bin

Make school lunches easy by adding your food to a bucket in the fridge! Perfection!

The cold lunch bin sits perfectly in my new Frigidaire Gallery® All Refrigerator. I have owned this appliance for a few months now and I LOVE how much space I have. Having this extra room in my fridge has saved my family time and money and has made it feasible to feed my kids healthy cold lunches on a regular basis. One of my favorite features is that it has an alarm on it if the kids leave the door open (which believe it or not has come in handy). And when I need to raise or lower the temperature it’s as easy as pressing a single button. Seriously it’s my favorite appliance in the house! And everyone that visits me comments on how cool it is and I have to agree. If you are looking to upgrade your appliances or build a new home in the future I would absolutely consider this amazing built-in set.

White Kitchen with big island - farmhouse style! kidslunchideas-2

The cold lunch bin holds all the cold lunch items that need to stay refrigerated. Once a week I will separate grapes, chop oranges or apples (if I did apples I would first soak them in pineapple juice or fruit fresh so they keep longer), and chop carrot or celery sticks. Some of the items I have kept in my own personal cold lunch bucket this past year are:

String Cheese or mini Babybel cheese
Yogurt smoothies or other yogurt cups
Carrots (I found little cups with lids at Cash n Carry that I add ranch dip to)
Sliced apples (soak for 10 minutes in pineapple juice or fruit fresh so they don’t go brown)
Homemade pasta salad
Sliced oranges
Mandarin oranges, whole
Green peppers, sliced thinly
Celery sticks
Grapes, cherries, cantaloupe or other seasonal fruit cut up
Green Salads
Turkey Pesto Rollups
Mini cups of hummus
Mini cinnamon streusel, blueberry, lemon poppyseed or even savory muffins


Frozen Freezer Lunch Bin

I typically just fill up my bin in the freezer with sandwiches or frozen homemade yogurt tubes.

Frigidaire All Freezer and All Refrigerator set.

I have found that the easiest way for me to make the sandwich part is to take a large roll or sandwich bun, add in meat and cheese only, wrap and freeze individually. My children will take them out in the morning frozen, add them to their lunches and by the time it’s lunch at school the sandwich has thawed. If they must have the condiments on their sandwiches, you can always add them in between the meat and cheese as it won’t penetrate the bread and make it all soggy. But don’t add in your lettuce or it will be a gross slimy mess. If your child likes lettuce, pickles, peppers or anything else on their sandwiches you could always make up individual bags of sandwich fixings and add it to the cold refrigerator lunch bin. Wraps and quesadillas will also freeze really well (my kids will eat them cold.)  Things to add to the freezer bin:

Meat & Cheese Sandwiches
Peanut butter & jelly sandwiches
Quesadillas
Frozen homemade yogurt tubes
Wraps with meat, cheese, pesto and/or cream cheese
Homemade hot pockets
HOW MANY TO MAKE?

To figure out how many to bag up for the week, I count out the number of days for cold lunch that week times how many children. Here is my own personal math: 4 kids x 5 days = 20.  20 bags of various chopped vegetables, 20 bags of various chopped fruit, 20 bags of chips/crackers, 20 string cheese or even treats if I feel nice that week..hee hee. 20 Sandwiches, quesadillas, or other main dish options. So I make everything all in one day then I’m all prepared.

WANT TO BE MORE “GREEN”?

One idea is to buy a bunch of re-usable sandwich bags.  They can be expensive to buy a bunch, but it is better for the environment.

Or you could use bento boxes or plastic containers. You would just prepare the lunch ingredients in advance use a few larger gallon sized bags and fill them with all the carrots, string cheese and other items. Then you can quickly fill the bento boxes or containers the morning of.

For me while I want to be green, I am also on a very tight budget. So when I look at spending $2.00 for 100 little plastic baggies versus having to spend hundreds on re-usables, well… it’s tough. So I will be trying to buy a few re-usable bags or container each month and slowly reduce my waste in the world. You just do what you can! Every little bit helps.

Have you tried making your cold lunches once per week using this method?
Got any other great food ideas for kids, teens or even your husbands’ lunch?

Awesome kids lunch ideas for helping save time. Make all your lunches in one day for the week and have your kids grab their own lunch and pack it easily each morning before school. I have done this method for years and it works!!

The post Make Ahead Cold Lunches {A Week’s Worth of Lunches in a day!} appeared first on Happy Money Saver.

17 Frugal Living Tips for the Frugal Beginner

$
0
0

thrifty-girl

Frugal living is often looked at as something that can be picked up and dropped whenever someone wants to, but the truth is that living a frugal lifestyle is exactly that; a lifestyle. It is something that you will do on a daily basis for as long as you’re looking to save money. It is also often viewed as something that is hard to do. That couldn’t be farther from the truth, but it is very easy to overwhelm yourself if you’re new to frugal living.

These 17 frugal living tips for the frugal beginner are a great place to start if you’re new to saving money. Tackle them one at a time until you’ve got them all down and then move onto more advanced ways to save.

17 Frugal Living Tips for the Frugal Beginner

Buy Only What You Need – Obviously if you’re looking to save money, the very first thing you should do is to stop buying so much. Knowing the difference between a want and need is so important to living frugally. Buying only what you need and letting your wants wait until you can afford them will help get your frugal journey off on the right start.

Shop with a list – When you shop without a list, you end up buying things willy-nilly and adding whatever happens to look or sound good to your cart. It is a fantastic way to lose money. Instead, never step foot in a store without a list and you’ll save more than you could imagine.

Use cash envelopes – When you go out to run errands, do you often find yourself spending more money than you meant to? If so, cash envelopes are a great option. Fill your envelope with no more money than you want to spend. When the money’s gone? Your spending is done.

Use less – Along with buying less comes using less. When you use less in every area that you possibly can, you save more money. Use less soap. Use less gasoline. Eat healthy portion sizes instead of double. Use less water and so on. The more you can use less of, the more money you’ll save.

Make more – Again, along with buying less comes making more yourself. These days, you can buy the supplies needed to make almost every single item that you buy on a regular basis. Convenience foods, beauty products, cleaning products and more are all fantastic places to start. If you need ideas or help, Pinterest is a great place to search.

Learn to say no – Sometimes, especially if you’re a parent, saying no can be an extremely hard thing to do. If you can’t say no though, you’re very likely costing yourself quite a bit of money each month. Learn to tell people no when you’re not able to do something or spend money on something. Your budget will be much more comfortable.

Use coupons – Coupons are a great way to save money and if you’re not using them on products that you already use, you’re costing yourself money that you don’t need to spend. You don’t need to become an extreme couponer to save, but using a few here and there will only help your budget.

What other ways have you found to save money when you’re just starting your frugal journey? Please share so others can save too!

The post 17 Frugal Living Tips for the Frugal Beginner appeared first on Happy Money Saver.

How to Create a Budget That Sticks

$
0
0

No matter what time of year it is, it’s always a good time to start delving deep into your finances and taking control of your spending and saving. One of the most important parts of managing your finances is when you create a budget.

How to Create a Budget That Sticks | Money Saving Tips

When you create a budget, you’ll want to create one that sticks! It’s easy to write one out and never follow it, but following it is the most crucial part. These tips will help you create a budget that lasts and benefits you for years to come!

Tips To Create A Budget That Sticks


1. Set goals.

It’s important to set goals before you start to create a budget. You’ll want to have a savings goal, a debt pay off goal, and just a general spending goal. If you have a lot of debt, you’ll likely want to cut down drastically on frivolous spending so you can pay your debt off quicker. Additionally, if you have a vacation or big event to save for in the future, you’ll probably want to put away quite a bit in savings during each pay period. Be realistic with your goals, and be responsible with them! Don’t skimp on saving or paying off debt to dine out. Prioritize!


2. Create a physical budget.

Having all of your goals in writing is a good idea. Sometimes the visual can really help to drive home how important your budget is! If you have something like a planner or bullet journal that you use throughout the year, creating a visual aid for your budget is a great idea, since you’ll be referring to it often. Otherwise, you can add goals and such to your calendar, too!


3. Use an app.

There are lots of apps and programs out there designed to help people create a budget that sticks. Things like Mint.com and Credit Karma are both great (and free) programs that can help you get on the right path financially. Sometimes utilizing an app to help give you direction and motivation can help create a budget that lasts a long time. Credit Karma can help you work on your credit, and while working on your credit, you’ll likely be more motivated to stick to that budget! Mint.com keeps a close eye on your spending and you can delegate certain allowances for different categories like “entertainment”, “food”, “utilities”, etc.


4. Print one out.

There are tons of printable budget sheets on places like Pinterest. Find one that you love and that works for you and print it out to fill out and complete! This can be a massive help when you first create a budget if you aren’t sure how it should be set up and what you should be accounting for.


5. Rewards!

If you have a hard time sticking to a budget normally and cutting down on spending, consider doing a type of reward system. For example, for every month that you don’t go over your budget, spend $30 on yourself for anything you want. For every 6 months you don’t go over budget, spend $100! Pick a realistic and financially sound reward and use it to motivate yourself!


Of course, don’t forget to check out my Money Savin’ page for the latest in deals to save you more money!


If this is the first time you’ve had to create a budget, what questions do you have? Let us know and let’s discuss in the comments below!


The post How to Create a Budget That Sticks appeared first on Happy Money Saver.


How to Celebrate Valentine’s Day on a Budget

$
0
0

Valentine’s Day is quickly approaching and it’s normal to feel a little stressed if you’re tight on money this year. Valentine’s Day can be a great day to spoil your loved ones and make them feel special, but if you’re on a budget this year – have no fear! These tips to help you celebrate Valentine’s Day on a budget can help your day go smoothly and just as romantically!


How to Celebrate Valentines Day on a Budget | Happy Money Saver

Tips For Celebrating Valentine’s Day On A Budget


1. Skip the dinner reservations.

This is usually one of the bigger expenditures of Valentine’s Day and one of the easiest places to make cuts so you can stick to your Valentine’s Day on a budget. Whether you decide to cook a nice romantic dinner in, have a picnic, or just eat as normal, there are plenty of ways to make your loved one feel special without splurging on a huge fancy dinner. It truly is the thought that counts, so skip the reservations and get creative!


2. Make something from the heart.

Sure, some people might think handmade gifts are cheesy, but ultimately they end up being remembered no matter what! Think of something like a deck of cards with “52 reasons I love you”,  coupon book, treasure hunt or something similar. It’s important to remind people how special they are to you and you don’t need to spend hundreds of dollars to do it! A letter from the heart, a nice handcrafted gift, or just telling them in person can go a long way.


3. Reschedule!

Rescheduling Valentine’s Day isn’t the end of the world, especially if you’re both on a budget! Stock up on clearance candy the day after the holiday and enjoy a night in together watching your favorite flicks on Netflix! Nothing like celebrating your love like saving money! In fact, you could even decide to put the money you save away in savings for a future trip together!


4. Do a “pal”entine’s day!

Even if you don’t have a significant other to celebrate this year, you could always come together with some friends and do a “pal”entine’s day! Get together with some of your closest friends and reminisce on some great memories and spend quality time together! Whether you hang out at someone’s house or go out to lunch, just make it a great day and let them know how special they are to you!


5. Don’t sweat it!

If you absolutely cannot swing Valentine’s Day on a budget (or not) this year, don’t sweat it! There are 365 days in a year to show someone you love them, and they’ll understand. Of course, you can buy something small like a card (don’t forget to check dollar stores for extra savings!) but ultimately, you can show someone you love them every day of the year!


Check out These Thrifty Valentines Day Ideas!


25 Valentines Day Gift Ideas Under $10

25 Valentines Day Gift Ideas Under $10


25 Thrifty Homemade Valentines Day Gifts | Happy Money Saver

25 Thrifty Homemade Valentines Day Gift ideas


The post How to Celebrate Valentine’s Day on a Budget appeared first on Happy Money Saver.

Thrifty Tip: Homemade All Purpose Orange Cleaner

$
0
0

This homemade all purpose orange cleaner will not only save you money, the smell will have you craving cleaning your home with only 2 ingredients!

The BEST Homemade All Purpose Orange Cleaner | Happy Money Saver


Can you believe spring cleaning is around the corner? Because at least for me time has gone so fast! Between all the Christmas shopping, the NYE celebration and the winter bundled up (+ the resolutions that are a staple around January) the months and days have come and gone so fast that I barely had enough to blink.

But with this new season coming around the corner I’m excited. It’s the time of the year that we do a deep cleaning, that we take the time to go through our stuff and Mari Kondo our heart out. But better yet, it’ the time of the year that gives us an excuse to DIY all the cleaning supplies we want.

Really, there’s nothing better than the homemade version of the cleaning supplies you need. They are chemical free, they smell great and honestly, they work as good as the ones you can purchase at the supermarket. Oh, and they are really cheap and frugal which is always a plus around here.

My all time favorite is this homemade all purpose orange cleaner. Simply put, it works.

The BEST Homemade All Purpose Orange Cleaner | Happy Money Saver


Actually, it works so well that I don’t buy any other thing to clean surfaces. It’s tough on the stains and gentle on the surfaces and it smells delicious which gives it a definite bonus point and makes it a delicious spring cleaning product. seriously… can’t you smell how fabulous this is even by the photo!

The BEST Homemade All Purpose Orange Cleaner Recipe


The BEST Homemade All Purpose Orange Cleaner | Happy Money Saver


And the ingredients? They are literal scraps!

Gather a mason jar, oranges, and white vinegar


The BEST Homemade All Purpose Orange Cleaner | Happy Money Saver


Add your orange peels to the mason jar.


The BEST Homemade All Purpose Orange Cleaner | Happy Money Saver

Add your white vinegar.

The BEST Homemade All Purpose Orange Cleaner | Happy Money Saver

Close it up and give it a good shake!

The BEST Homemade All Purpose Orange Cleaner | Happy Money Saver

Store in a dark cool place for 2 weeks and then remove the peel.

Told you this was an easy project!

I like to store it in a spray bottle or the mason jars and then just pour a bit of it on top of the surface that needs cleaning and rub it with a cloth.

Basically use it on top of the same things where you would use an all purpose cleaner.

Homemade All Purpose Orange Cleaner

This simple homemade all purpose orange cleaner will have you craving cleaning your home!

  • 2 Cups White Vinegar
  • 4 Orange Peels (Clean off all fruit)
  • Distilled Water (optional)
  1. Clean and dry a mason jar.

  2. Make sure that the peels have no traces of fruit left, add to mason jar.

  3. Add in white vinegar.

  4. Close the lid tightly and let it sit in a dark and cool place for 2 weeks. 

  5. Remove orange peels.

  6. Use as needed as is or dilute with distilled water to clean your home surfaces.

This is a concentrate so you can either use it as is or dilute with distilled water.


Happy Cleaning! 

The post Thrifty Tip: Homemade All Purpose Orange Cleaner appeared first on Happy Money Saver.

DIY Bathroom Makeover in One Day Under $300

$
0
0

This is a sponsored conversation written by me on behalf of SCHLAGE. The opinions and text are all mine.


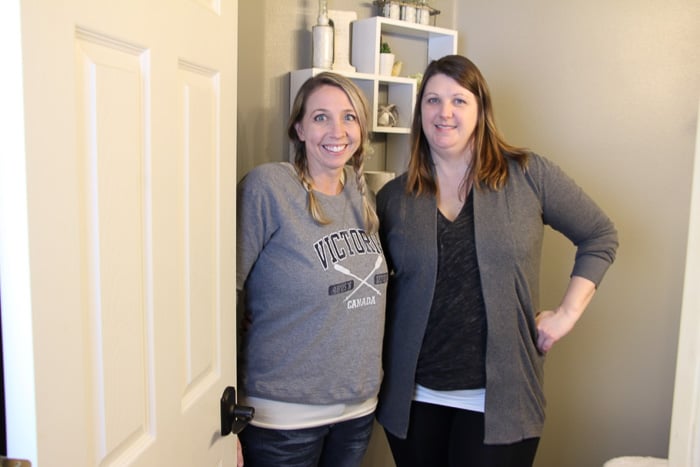
You all know I love a good makeover, but now that my own home is complete, I’m running out of rooms to re-do! It’s a good thing I have no shortage of friends who are willing to let me bring my funky farmhouse style into their own homes. What do my pal, Tracy and I do with a day to hang out… refresh her bathroom of course! We did this DIY bathroom makeover in one day, for under $300! Just in time for her company to arrive.

Many people shy away from home renovations because it seems too daunting, or they don’t have the experience. Never fear… most of the biggest impacts in home decor, are small, easy and inexpensive fixes.

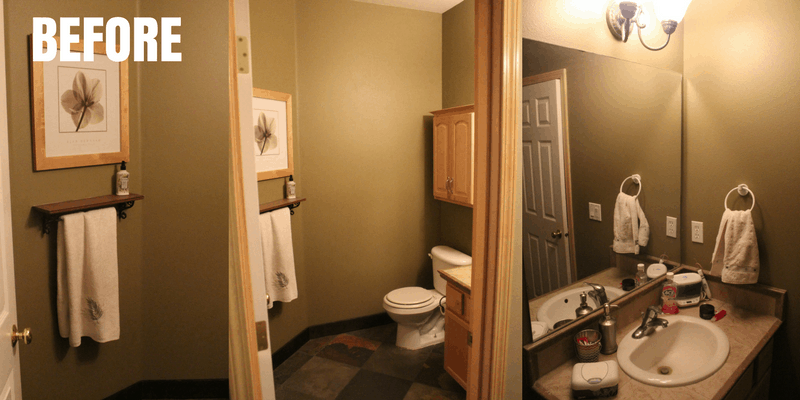
Tracy’s main floor bathroom is like many, on the smaller side and a bit dark. There was nothing “wrong” with it as is, but the paint was dark and dull, the light barely enough to light the room, and the hardware was a mix of gold, bronze, and white. She was really seeking to brighten it up and give it a fresh new look before her out of town family came for a visit.


DIY Bathroom Makeover BEFORE


We made a pretty hefty list of things we wanted to get accomplished for one day, but with the two of us and her two daughters being home from school (another snow day), we had plenty of helping hands and we set our goals high. We started by addressing the obvious things that were easy fixes.

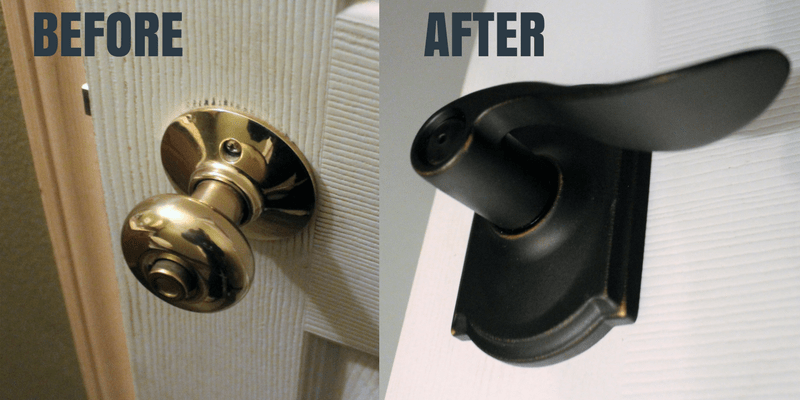
Hardware & Fixtures: We needed to replace the ugly worn plain gold door handle, update the light fixture to something brighter, and replace the white plastic towel hanger. Upgrading door hardware is a quick, affordable and impactful way to express personal style.

Paint: Dark green… hmmm… not the best for a small space. My farmhouse chic style tells me we need to update with a fresh light modern gray and accent with some clean whites! For the white, we will paint the existing Maple cabinets to give them a new look and brighten the space. Don’t get me wrong. I LOVE maple, but in this small space, it was giving a yellow hue that made the space dreary.

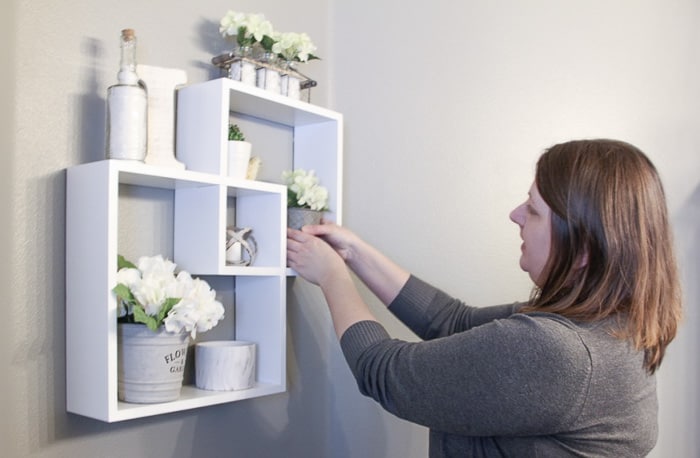
Decor: One of the easiest and one of the most fun to shop for updates. There was an old broken shelf and dated photo on the wall that we would replace with fun decorative items in our accent colors and a super fun update to a plain old mirror by adding glass tiles.

What do you think?

Can we get this DIY Bathroom Makeover ALL done in ONE day?


DIY Bathroom Makeover in One Day Under $300

Off to Lowes we go! We had an idea of what we wanted to do, but we needed to find all the hardware, fixtures, tools, paint and accessories to make it happen.

Shopping at Lowes for DIY Bathroom Makeover


Well, who would have thought our whole design inspiration would come from new door hardware! We started looking for the new hardware first since it was literally the first thing we walked by in the store. Dollar for dollar, updating your door hardware makes a bigger impact on your home than many other afternoon projects and can match the other finishes in your home to complement your home’s unique style and décor.

Tracy was instantly drawn to the accent aged dark bronzed sleek style of the quality brand, Schlage. Schlage believes that style lives in the details because the details bring everything together in a home. Isn’t this Accent Lever beautiful! Best of all, right now you can get 20% off these amazing door handles at Lowes… SCORE!

Off we went to find the new light fixture, we used the color of the door hardware to guide us on the rest of the hardware for the room. We both instantly knew we had to have the farmhouse style light in the same finish with those amazing Edison Bulbs. BONUS… it has 4 lights compared to the existing 2-light fixture, so it’s sure to give the room a bright new look, AND was clearance priced!

Some paint, small glass tiles, a new shelf, some fun decor items, and we were set to get this DIY bathroom makeover started!

We decided the best strategy was to divide and conquer. While Tracy and I painted the bathroom in the new shades of gray, the girls took on painting the base and wall cabinet (white chalk paint), assembling the wall shelf, and putting together the new flower arrangements.

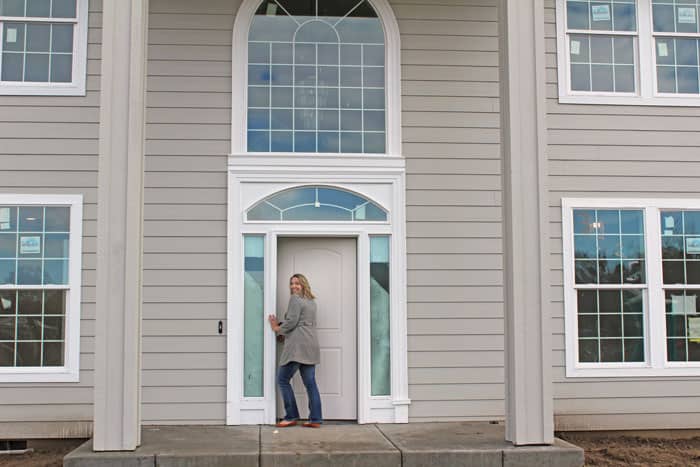
While the paint dried, we tried our hand at the hardware and fixtures. GIRL POWER! The four of us girls were left to install the Schlage door hardware, the new towel ring and the new light fixture. We both had a little experience in a few areas but had never done any of these things on our own. With each other for moral support, WE DID IT! and guess what… it was soooo much easier than I ever thought possible.


Easy Door Hardware Replacement for a Fresh Clean Look with Schlage


It literally took me 2 minutes to change the door hardware by myself and what a BIG impact getting rid of that ugly old gold thing!


Me installing a new Schlage Door Lever on the Bathroom Door!


We finished painting the cabinets, hung and decorated the shelf and then sat back and enjoyed a glass of lemonade.


Tracy adding the finishing touches on the DIY Bathroom Makeover!

DIY Bathroom Decor

The kids took over giving the mirror a new look with glass tiles and sticky tape while we relaxed. YES… it’s that easy!

DIY Bathroom Makeover


Is it weird I want to just hang out in the bathroom all day? I just can’t stop looking at it and what a difference a handful of small, easy projects can do to make a really BIG impact.


DIY Bathroom Makeover in One Day Under $300

Tracy is already asking me when I’m coming back over and bribing me with sweet treats so we can finish the whole downstairs. She’s even bought two matching sets of Schlage door hardware for the closet doors and has paint ready! (Pssst….. From 2/15/17-3/13/17, get 20% off your Schlage interior hardware purchase at Lowes online or in store!) Guess I better get into full DIY mode and have my screwdriver handy!

Follow Schlage on social media for more easy and affordable inspirations for your home:


Comments submitted may be displayed on other websites owned by the sponsoring brand.

This is a sponsored conversation written by me on behalf of SCHLAGE. The opinions and text are all mine.

The post DIY Bathroom Makeover in One Day Under $300 appeared first on Happy Money Saver.

Thrifty Tip: How to Save Money on Groceries

$
0
0

Groceries are one of the biggest expenditures in most budgets, and you might be wondering how you can save a few bucks here and there on your groceries. If so, you’ve come to the right place! In this post, we’ll be talking about how to save money on groceries with some basic tips (and some unique ways you might not have thought about yet)!


Thrifty Tip: How to Save Money on Groceries | Happy Money Saver

Tips To Save Money On Groceries


1. Shop on Wednesdays.

Typically, Wednesday is the day sales start for grocery stores (although this may vary). Try to shop as close to the sale date as possible so you can maximize those savings by getting the things you need on sale before other people buy them out. Keep in mind that if you want something on sale during the sale week and you can’t find it, you can grab a raincheck to get it for sale price when it becomes available again. Rainchecks usually do expire, so be aware of that if you grab one.


2. Check for clearance!

Most grocery stores have a small section for clearance items that they need to get rid of. You’d be surprised how many goodies you can find in a grocery store clearance section! While the end goal is to save money on groceries, you might also be able to find toiletries and other items in the clearance section, so this is a good idea. We recommend stopping by the clearance section on every trip – just so you don’t miss out on anything!


3. Use coupons.

Of course, this is pretty common knowledge, but just a friendly reminder that you can save money on groceries in massive amounts by using coupons. Additionally, you can use apps like Ibotta and SavingStar to get cash back on your purchases to make the savings a little sweeter. Always check the apps to see what you can earn cash back on before you go shopping so you can double up those deals with coupons as well!


4. Meal plan before shopping!

When you lay out your meal plan for the week, look at the ad simultaneously! This way, you can plan your meals based on the sales. Meal planning can help you save money on groceries every week, especially if you’re including the ad in your decision making!


5. Buy store brands!

For the most part, name brands aren’t any better than store brand items. Some people have certain items they aren’t willing to budge on, and that’s okay too. Skip the name brands wherever you can to save money on groceries and cut costs drastically!


What other ways do you save money on groceries? Let us know in the comments below so we can share tips!

Don’t forget to check out all my “Money Savin'” posts too for great deals!


The post Thrifty Tip: How to Save Money on Groceries appeared first on Happy Money Saver.

5 Unique Ways to Save Money

$
0
0

Saving money is no easy task. Sometimes it can be hard to do when you’re on a tight budget, but it is possible! These are some of our favorite tips and ways to save money that you might not have thought of yet – so keep reading!


5 Unique Ways to Save Money | Happy Money Saver


5 Unique Ways To Save Money


1. Skip the restaurant!

If you’re trying to find ways to save money, dining out should probably be kept to a minimum anyway. However, if you want to go out for food one night, consider hitting a food truck or a local cafe instead of a fancy restaurant. Food trucks and small cafes can sometimes have meals for a fraction of the price!

2. Use everything in your pantry!

It can be easy to buy food and never end up using it causing the dreaded pantry build up! Instead of just forgetting about what’s in there, keep it to a minimum. Use as much as you can every week and don’t leave anything behind if you have the option! By cooking more at home and trying to utilize all the ingredients in your pantry, you’ll be cutting down on food waste and saving money every week!

3. Use gift cards!

Have you ever seen the deals at grocery stores where you can earn double points for buying gift cards? Take advantage of those! You already know you’re going to be shopping at the store for groceries anyway so rack up those points by buying gift cards for money you’d planned on spending anyway! Whether those points translate into gas savings or rewards, you’ll be saving money and this is a unique trick to help you save!

4. Visit your local beauty school.

If you’re due for a haircut or want to get a style, consider stopping by your local beauty school. The prices are extremely cheap in comparison to salons and the students could use the experience as well! If you’re really particular about your hair, this might not be one of your favorite ways to save money, but in a pinch, it is a lot better to spend less on something like a haircut. After all, it grows back!

5. Avoid ATMs.

ATMs can come with hefty fees for withdrawing money, so avoid them when you can! Instead, consider getting cash back when depositing your check and keeping cash on hand every month just in case you end up needing it. Of course, you likely won’t always be able to avoid ATMs, but any chance you can is money saved!


These are some of our favorite unique ways to save money. What are your favorites? Let’s discuss this in the comments!

The post 5 Unique Ways to Save Money appeared first on Happy Money Saver.

How To Have A Date Night Out Totally Free

$
0
0

Date night is important for any relationship, but you might be wondering how you can make time for each other without having to spend any money! If you’re on a budget or just trying to live a more frugal lifestyle, free date nights are definitely the way to go! There are a lot of different options for free date nights, so keep reading to get some ideas!

How to have a date night out totally free! These are great frugal tips!

Spend it outdoors.

If you and your partner enjoy spending time outdoors, this is the perfect idea for a free date night! Whether you spend it taking a stroll through a park, camping, or just getting some fresh air, it’s guaranteed to bring you closer together! Weather permitting, you could also go for a swim together, go snowshoeing, or even hiking! Just pack a few snacks from home for your outdoor excursion and head out!

Make a trade!

Even if you find a totally free date idea, if you have to spend money on a babysitter, it can kind of put a dent in your budget! Consider trading date nights with another couple and trading babysitting services with each other so you don’t have to pay a babysitter or nanny! This is a great way to give back to each other and save money as well!

Consider a night in.

Of course, this post is about a night “out”, but sometimes a night “in” can be even better! Spend the night cooking dinner together! Sometimes spending a quiet night in is perfect for rekindling that spark and really focusing on each other. Whether you cook, order takeout, or even get a pizza delivered, pop on some Netflix or just spend the time enjoying each other’s conversation! This makes for a totally free date night (if you don’t order food), and can be some of the best quality time.

Volunteer!

Find something great to give your time to as a couple. Whether it’s your local humane society, a soup kitchen, or an elderly home, finding something to do together to give back to your community can both make you feel good and bring you closer together! Besides, you could really enjoy it and decide to keep doing it on a regular basis!


What other free date night ideas are your favorites? When is the last time you had a date night out? Let’s discuss in the comments below!

The post How To Have A Date Night Out Totally Free appeared first on Happy Money Saver.

9 Budget Anniversary Gifts That Don’t Appear Cheap

$
0
0

It’s that time of year again – your anniversary – and you might be stressed about giving gifts if you’re stuck to a tight budget! Financial worry is a pretty common tension point for many marriages, so you aren’t alone! Of course we know it’s the thought that counts, but sometimes you still want to get a gift that doesn’t appear cheap, right? Today we are sharing 9 budget anniversary gifts that don’t appear cheap so you can stay on track with your budget and also feel proud of the gift you’re giving!


9 Budget Anniversary Gifts That Don't Appear Cheap - these are great anniversary gift ideas!


1. A cross stitched wedding sampler.

If you have skill in cross stitch, this is a great idea! It is personal, unique, and something that won’t cost much to make. Make it unique by including things like your favorite sports teams or colors, a shape of the state you were married in, or something else that makes sense to both of you and maybe no one else!

2. A marriage clock!

Take the batteries out of a decorative clock and set it to the time you got married. You could write a poem around it or frame it in a shadow box with some other things that are important to your marriage. Aside from the cost of the clock, this is an inexpensive and thoughtful gift which is why it made our list of budget anniversary gifts!

3. A candy bouquet.

Candy is relatively inexpensive and if your significant other has a sweet tooth, out of all these budget anniversary gifts, this one might be the most appreciated! Consider using red vines to make it look creative!

4. Photo album.

Photo albums are relatively cheap to put together but the sentimental value is priceless! Whether you put together a digital photo album or a physical one with printed pictures, these memories are sure to bring a smile to your partner’s face.

5. Video with messages to your loved one.

This is one of the best budget anniversary gifts for those special milestones like “10 years”, “20 years”, and so on. Film a video message from close friends and family to celebrate your loved one and surprise them. They’ll certainly feel special and loved after that!

6. Plant a tree together!

This is great for those who love to be outdoors and celebrate nature. Plant a small tree in your yard and watch it grow throughout the years as your love does!

7. A Jar full of love notes!

This is one of the more simple budget anniversary gifts on the list – but definitely not the least thoughtful! Fill a jar full of love notes and sweet messages for your partner to read all year long. You can even fold them up and include things like “for when you’re sad”, “for when you’re going through a tough time”, etc. to make them for certain occasions and pick me ups!

8. A hand painted picture

Get in touch with your artsy side and hand paint a picture on canvas of a quote that means something special to you or really get creative and paint a landscape of a special place you share.

9. Chocolate lover’s bundle!

If your partner loves chocolate, consider making a chocolate lover’s bundle. Include all sorts of varieties of chocolate candies, hot chocolate mixes, and bundle it up in a cute chocolate emergency basket!

I love these budget anniversary gifts because they still say “I love you!” without emptying your pocket book! Also check out, “How to Have a Date Night Totally Free” for more budget friendly ideas!

What is your favorite anniversary gift you’ve ever received?

The post 9 Budget Anniversary Gifts That Don’t Appear Cheap appeared first on Happy Money Saver.


How To Freeze Quinoa

$
0
0

Ever wonder how to freeze quinoa? Well, I’ve got your back. Cooking and freezing quinoa in bulk is a great way to save money and more importantly time!

I’m not sure I have mentioned this on my blog yet, but recently my 12-year-old daughter had a food allergy test. And I nearly cried. She is allergic to wheat, oats, and even yeast! Wheat and yeast are seemingly in everything. I’m totally not a pro yet with making new foods without these ingredients, but I’m working my way into trying to figure out some foods she CAN eat. And quinoa is one of them! Yay! So I’ve been making ahead grains she can have like quinoa to freeze.

Follow these tips to help you learn how to freeze quinoa so you can cut down your meal prep time and eat healthier more efficiently!

How To Freeze Quinoa

Here is all you ever wanted to know about freezing quinoa.

1. Cook the quinoa.
This goes without saying, but you’ll want to cook the quinoa first! Since you’re going to freeze quinoa, it’s a good idea to cook a larger amount so you have plenty to freeze (and eat if you’re cooking some to eat right now too). If you’re meal planning for a family, cook accordingly so everybody has enough. Cook according to package or to desired doneness.

2. Lay it out to cool.
You’ll want to lay out the quinoa and let it cool before you start portioning it to go in the freezer. You could certainly freeze quinoa all together but it’ll cut down on time spent in the kitchen during the week if you portion them out to individual servings. After they’ve cooled, start scooping them into the portions you want and then pour each portion into a sandwich or freezer bag.

Note: Make sure to squeeze the air out of the bags before putting them in the freezer!

3. Defrost!
After you freeze quinoa, you’ll want to defrost each pack individually as you use it. To defrost, either thaw at room temperature or in the microwave for 30-60 seconds. Once you’ve defrosted the quinoa, you can pair it with a salad, meat of your choice, or a sauce! However you decide to eat your quinoa, you’ll be able to do so in no time because the thawing process is relatively quick!

See how easy it is? Easy peasy.

Frozen quinoa can be used for a multitude of different recipes and make your meal planning much less time-consuming.  Plus a little quinoa goes a long way, so that’s really nice too.

What are your favorite spices or recipes to use with quinoa? Seriously, I need to know!

The post How To Freeze Quinoa appeared first on Happy Money Saver.

Spring Cleaning Hacks

$
0
0

Spring is upon us and it’s time to start that spring cleaning! Whether you’re just looking to tidy up a little or want to do a major overhaul, spring cleaning hacks are sure to help you save time and sanity! Today, we’ll be sharing some genius spring cleaning hacks to help you get started and ensure your success this spring. You’ll have your house looking spiffy in no time!

Take advantage of these spring cleaning hacks to get your house looking cleaner than ever before this spring cleaning season!

Spring Cleaning Hacks

1. Sections!
Start with one room at a time. If you try to clean the whole place at once, you’ll likely get overwhelmed and want to give up! Start with the room that has the most work to be done first. This way, if you don’t get through everything you want, you at least get the most important stuff done first. Most people find that starting in the bedrooms is easiest, because if you’re purging clothes, you’ll be able to take a lot out and clear up space for other things.

2. Cubbies!
Feeling like you have too much clutter? Cubbies can reduce the appearance of clutter while still allowing you to organize and keep the stuff you love. You can find a pack of cubbies on Amazon for relatively cheap, and you can even match them to your home decor!

3. Use a lazy Susan!
Getting ready to clean up the inside of your fridge? Use a lazy Susan to help you reduce spills and make things in your fridge more easily accessible. This will also help you avoid the dreaded forgotten food in the back, making it less likely you’ll have to deal with mold!

4. Don’t throw away the lonely single sock!
If you’ve got a sock without a match, don’t throw it away just yet! You can put it on your hand and use it to dust blinds easily and quickly. Make sure you start at the top so you don’t have to go over the same spots twice! After, you can either wash and reuse for dusting later or just toss it!

5. Clean under the bathroom sink.
Stuff is constantly getting stored under the bathroom sink, and spring cleaning is the time to get rid of things that have been there for a year (or longer!) and haven’t been used. Get rid of expired medicines, old bottles of soap or lotion, and anything you just aren’t using anymore! Once you clean under the sinks, you can make room for new things or better ways to organize like baskets and bins.

6. Clean that shower head!
Shower heads are often overlooked in routine cleaning, so spring cleaning is a great time to give it a good scrub. One of the easiest spring cleaning hacks around is to fill a small bag (think sandwich bag) with vinegar and attach it to your shower head overnight to soak. Use a rubber band or hair tie to keep it secured. Remove it in the morning and wipe it down for a sparkly clean shower head!

Which of these spring cleaning hacks will you try this year? Let us know in the comments below!


Try my Homemade All Purpose Orange Cleaner!

The BEST Homemade All Purpose Orange Cleaner | Happy Money Saver

The post Spring Cleaning Hacks appeared first on Happy Money Saver.

How To Freeze Breast Milk

$
0
0

Freezing breast milk is cost effective, easy to do, and can be very beneficial to working moms or moms who need to be away from baby for a period of time! If you’re breastfeeding for the first time and aren’t sure about how to freeze breast milk – keep reading! These tips to freeze breast milk are easy to follow and extremely time efficient as well!


Tips To Freeze Breast Milk

1. Choose your container.
Some people choose to freeze milk in ice cube containers for older babies who have things like mesh feeders and such. This is one way to freeze breast milk, but if you’re looking to freeze more at a time or will be continuously freezing milk, you might want to consider breast milk bags. You could use something like sandwich bags as well, but typically breast milk bags are easier and most of them come with a douple zip lock, preventing leakage in the fridge or freezer. Most brands make similar bags, so just pick what’s cheapest or that works best for you.

2. Write the date!
Always write the date of your frozen milk somewhere. Whether you write it directly on the bag with a sharpie (something that won’t smear), or you write it down in a journal or on a sticky note somewhere, just make sure you know the date for each container! This will help you utilize the oldest milk first so you’re staying on top of the freshness of all of it.

3. Keep it all together.
It’s pretty easy for frozen milk to start taking over your freezer space if it isn’t organized well. If you’re not planning on buying an extra freezer just to store milk in, consider using a specific shelf or drawer in your freezer just for when you freeze breast milk and build up a stash.

4. Don’t refreeze!
Once you thaw milk for consumption, do not refreeze it. Thawed milk is safe for 24 hours in the refrigerator, so be sure to only thaw as much as you need and use it right away.

5. Freeze in small amounts.
Even if you ultimately end up freezing in breast milk bags, consider freezing in smaller amounts so you won’t have to thaw too much at once. The bags generally hold 6-8 ounces, but freezing in smaller increments like 2-4 ounces will allow you to thaw less at a time.


These tips will help you freeze breast milk in the easiest and most cost effective way!


What other tips would you share for someone who wants to freeze breast milk? Let’s discuss in the comments below!

The post How To Freeze Breast Milk appeared first on Happy Money Saver.

9 Budget Mothers Day Gifts That Won’t Break the Bank!

$
0
0

Mother’s Day is coming!!! Giving Mom a special day can get expensive if you aren’t watching what you’re doing.  These 9 budget Mothers Day gifts show you care without breaking the bank and are a great place to start for anyone who might have a small budget but wants to give a gift that will be remembered year after year.


9 Budget Mother's Day Gifts That Won't Break the Bank


Personalize a Gift Basket – If your mother has a favorite thing, why not put together a gift basket filled with hand picked items (by you, of course) that is filled with those things? You could do her favorite snacks, spa products, movies and so many other options. Make sure that you include a handwritten gift note and that your gifts are only things that she will enjoy.

Write her a letter or poem – We live in a world where handwritten notes are being more and more rare so why not write your Mom a letter? Even better, take it one step farther and spend a month or a year writing a journal specifically for them? Give it to her on Mother’s Day and she will have something that she can come back to over and over again to remember how much she is loved.

Serve a quirky meal – Candlelit dinners are cliche’, but take those candles and make them quirky and you’ve got a memorable meal for years to come. Set up an in-house restaurant with you waiting on her personally, give some options for the meal and provide some cooking entertainment.  You’ll get to spend time with your family and she’ll get a kick out of how “strange” the meal is.

Be cliche’ – On the other hand though, sometimes cliche’ isn’t a bad thing. Serve a candlelit dinner, buy roses, and write her sappy poem. Whatever you do though, make it memorable.

Give a wildflower bouquet – Roses are great, but some of the prettiest flowers are the ones that grow wild. Find a field near you and take the time to pick a bouquet filled with beautiful wildflowers. Your mother will appreciate the time that you took and you’ll have a cheap, but amazing gift to give. Just be sure to ask for permission first if you are going to pick on someone’s land. A bouquet of flowers isn’t worth a trespassing charge!

Get handy – If you’re handy with things like tools or at crafting, why not make your Mother’s Day gift? Do a little research and find what Mom has been wanting but couldn’t afford. Make it for her if possible.

Offer Service – Sometimes the best gift is one that is truly needed but the gift recipient won’t tell you that they need. This could be anything from help cleaning the house to a night away and anything in between. Pay close attention to Mom and if there’s a need they need fulfilled? Find a way to include that need into your gift.

Plan an evening of favorites – Another budget gift that is easy to personalize is an evening filled with her favorites. Plan her favorite meals. Do her favorite activities and even listen to her favorite music. The basic idea is to make everything about that night all about her and to pamper her like she’s never been pampered before.

Plan a box office bash – This budget gift is great for movie buffs, but will work for just about anyone. Plan an evening centered around movies. Serve several different flavors of popcorn and soda, watch her favorite movies, visit a film centered museum and do other activities that are all centered around the big screen. She’ll have a blast while relaxing at the same time!


What are some of your favorite budget gifts for Mom? Share in the comments below!

The post 9 Budget Mothers Day Gifts That Won’t Break the Bank! appeared first on Happy Money Saver.

How To Have A Graduation Party On A Budget

$
0
0

Graduation season is around the corner and it’s time to start prepping for graduation party time!

This year my twins will be graduating from high school. I know, I know! Crazy, right? It was only yesterday…..sniff, sniff. So this June I will be having my first ever graduation party at my new house. And I don’t even have my grass in yet. There is much to do. And I’m of course on a budget. So I’ve been researching ways to save money while still having a really great party.  After all, graduation parties should be more about celebrating your loved ones rather than spending money. I know I’d rather spend more money on a graduation present or buying my kiddos college bound stuff. So hopefully these tips will help you and me stick to our budgets!

Graduation season is around the corner and with these tips, it's easy to host a graduation party on a budget for your beloved grads!

Tips To Have A Graduation Party On A Budget

1. Host a potluck!
Instead of spending a ton of money on food for the party, consider hosting a potluck! Most people don’t mind bringing a dish and this takes a lot of the financial stress off you, the host. It’s also a great way to get a nice variety of food! Even if you don’t need a ton of food for the party, you can have people bring things like drinks, paper plates, etc. to help out with the financial load!

2. Photos!
Instead of spending money on graduation party decorations at big box stores, make your own! Something like a string and a few clothing pins hanging black and white photos of the grad’s life all throughout the venue is a great way to get people reminiscing and celebrate your loved one’s accomplishments. I’m thinking about doing this one myself. You could also cut out cardboard in the shape of the year of their graduation and cover it in photos as a nice centerpiece!

3. Chalkboards!
This is a great way to stay on theme for your graduation party and you can chalkboard paint just about anything you have lying around! Turn old picture frames into chalkboards featuring the grad’s accomplishments, future plans, etc.

4. DIY invitations!
There are tons of expensive options for invitations everywhere but you can save a ton of money by doing them yourself. If you aren’t super artistic, there are free graduation party invitation templates online. If you have someone artistic in the family, consider having them whip something up for you on Photoshop or another graphic design program. I often check etsy.com for inexpensive templates as well.

5. Photo booth!
Consider setting up a small photo booth area for everyone to take fun pictures with the grad! This is a great way to create memories for them to look back on for a lifetime. Small props add a touch of fun to your graduation party!

What other things do you like to add to your graduation party celebrations to make memories? You doing a grad party this year too?

The post How To Have A Graduation Party On A Budget appeared first on Happy Money Saver.

Viewing all 142 articles
Browse latest View live


Latest Images